Slurm Job Submission and Scheduling
Job submission and scheduling with Slurm
MSI uses Slurm as its job queueing and resource management system to efficiently and fairly manage the resources used by all users. When jobs are submitted to a queue (partition in Slurm nomenclature), they wait until the appropriate computational resources are available.
To submit jobs to a Slurm partition, users must first write Slurm job scripts. Slurm job scripts contain information on the resources requested for the calculation, as well as the commands for executing the calculation.
Writing Job Scripts
A Slurm job script is a shell script with special lines that specify the resources required for the job as well as the commands to perform the computation. The script must be in plaintext.
If you are not sure where to start, copy one of the working examples below and edit it for your job. In most cases you will want to set the partition, walltime, CPU count, and memory explicitly rather than relying on defaults.
Standard Batch Job
#!/bin/bash -l
#SBATCH --job-name=my-analysis
#SBATCH --partition=msismall
#SBATCH --nodes=1
#SBATCH --ntasks=16
#SBATCH --mem=32g
#SBATCH --time=01:00:00
#SBATCH --output=slurm-%j.out
#SBATCH --error=slurm-%j.err
#SBATCH --mail-type=END,FAIL
#SBATCH --mail-user=your-email@example.com

# ---------- Commands ----------
cd ~/program_directory
module purge
module load <software name>

# Keep threaded programs aligned with the CPUs requested from Slurm.
export OMP_NUM_THREADS=${SLURM_NTASKS}

./program_name inputfile > outputfile
GPU Job
Use this pattern for applications that require GPU accelerators, such as deep learning or molecular dynamics.
#!/bin/bash -l
#SBATCH --job-name=my-gpu-job
#SBATCH --partition=msigpu
#SBATCH --nodes=1
#SBATCH --ntasks=16
#SBATCH --mem=32g
#SBATCH --time=01:00:00
#SBATCH --gres=gpu:v100:1
#SBATCH --output=slurm-%j.out
#SBATCH --error=slurm-%j.err

# ---------- Commands ----------
cd ~/program_directory
module purge
module load <software name>

./program_name inputfile > outputfile
The --gres=gpu:<type>:<count> directive requests GPUs with a specific type (e.g., v100, a40) and count (e.g., 1, 2, 4). Use --gres=gpu:v100:2 for two V100 GPUs. You must select a partition that offers the GPU type you need. The msigpu partition provides shared GPU access. Private GPU partitions may also be available to your group.
Job Array
A job array is a collection of similar independent jobs which are submitted together to Slurm using a job template script. The advantage of using a job array is that many similar jobs can be submitted using a single job template script, and the jobs will run independently as they are able to obtain resources on the compute cluster. Using a job array can be advantageous for calculation throughput, especially for small independent calculations that may be able to run “in-between” larger calculations.
The jobs will run independently as they find available resources on the compute cluster. Note that users are limited to 2,000 jobs within the scheduler at any point (including those listed as “Completed”); each element of an array job counts as an individual job.
We have a helpful Job Array video on our MSI YouTube channel that explains much of the below and more.
Job arrays are mostly easily used if input and output files for independent calculations can be numbered sequentially.
Use this pattern to submit a collection of similar jobs that differ only by an input file or parameter.
#!/bin/bash -l
#SBATCH --job-name=my-array
#SBATCH --partition=msismall
#SBATCH --nodes=1
#SBATCH --ntasks=16
#SBATCH --mem=32g
#SBATCH --time=01:00:00
#SBATCH --array=1-10
#SBATCH --output=slurm-%A_%a.out
#SBATCH --error=slurm-%A_%a.err

# ---------- Commands ----------
cd ~/project_directory
module purge
module load <software name>

./program_name input_${SLURM_ARRAY_TASK_ID}.dat > output_${SLURM_ARRAY_TASK_ID}.txt
The --array=1-10 directive creates 10 independent jobs, each with a different SLURM_ARRAY_TASK_ID value (1 through 10). The %A placeholder expands to the %a expands to the array task ID, making each task’s output files unique. Use the SLURM_ARRAY_TASK_ID variable inside the script to select different input files or parameters for each task. To limit the number of tasks that run concurrently, use --array=1-100%5 (max 5 at once). Submit the script once with sbatch and check status with squeue -j <Slurm Job ID> or sacct -X -j <Slurm Job ID>.
In these examples:
--job-namegives the job a readable name insqueueoutput.--partitionselects the queue to use. The partition must match the kind of resources your job needs.--outputand--errorwrite standard output and standard error to files that include the Slurm job ID.--ntasksis the number of processor cores requested.
The script must include the commands needed to run your workload successfully, including moving to the correct directory and loading the required software modules.
The first line in the Slurm script defines which shell the script will be run with. This is required of all shell scripts, and Slurm job scripts are no exception. MSI recommends using Bash:
#!/bin/bash -l
Directives for the Slurm queuing system are used to specify the resources requested by the job; these lines begin with #SBATCH. For example, --time=01:00:00 requests a walltime of one hour, --ntasks=16 requests 16 processor cores, and --mem=32g requests 32 GB of memory.
The resource request must contain appropriate values; if the requested time, processors, or memory are not suitable for the hardware, the job will not be able to run.
The directives #SBATCH --mail-type and #SBATCH --mail-user control email notifications. The --mail-type directive instructs the Slurm system to send an email when the job begins, aborts with an error, or finishes successfully. Other options include NONE or ALL. The --mail-user directive specifies the email address to be used. Using message emails is recommended because the reason for a job failure can often be determined from those emails.
The rest of the script contains the commands that will be executed to perform the calculation. A Slurm script must contain the appropriate commands to set up and run the calculation, including cd and module load commands.
Common reasons jobs do not start immediately
Slurm schedules jobs according to both the resources requested and the limits configured for users, groups, and partitions. Jobs can remain pending/waiting in the queue if:
The requested partition does not have enough free resources yet (see Job Sizing and Efficiency)
The request is larger than necessary and is harder for the scheduler to fit
The requested walltime, memory, node count, or local scratch exceeds a partition limit (see Shared Partitions)
Your group or user has reached a job-count or resource-usage limit
If your group’s recent usage has been larger than your group’s fairshare target on a particular machine, your jobs will have lower priority and may take longer to start
It might be MSI’s monthly maintenance day (first Wed of every month) or you may be requesting a walltime of such a length that your job cannot finish before the next maintenance window; jobs will not start if they cannot complete
If a job is pending, the NODELIST(REASON) column in squeue is often the fastest way to see why. Further information for a specific job can be obtained using the squeue command, replacing jobID number with your own jobID number:
squeue -j jobIDnumber
Submitting Job Scripts
Once a job script is written it is submitted using the sbatch command:
sbatch scriptname
If you prefer, you can also provide the partition on the command line:
sbatch -p partitionname scriptname
MSI recommends specifying the partition either in the script or on the command line because it is easier to troubleshoot problems arising from insufficient or incompatible requested resources.
Viewing and Canceling Jobs
To view the jobs submitted by a particular user, use the squeue command:
squeue --me
This displays your current jobs and their associated job ID numbers. When run with no options, squeue shows jobs for the whole system.
Useful variations include:
# Show one job with the reason it is pending or the node it is running on
squeue -j 12345678

# Show your jobs with a few more helpful columns
squeue --me -o "%.18i %.9P %.20j %.8T %.10M %.6D %R"
Some common job states you may see are:
PD: pending, waiting for resources or limitsR: runningCG: completingCD: completed successfullyCA: canceledTO: timed out
For completed jobs and older job history, use sacct:
# Jobs submitted during the last day
sacct --starttime now-1day --format=JobID,JobName%25,Partition,State,Elapsed,MaxRSS

# One specific job and its steps
sacct -j 12345678 --format=JobID,JobName%25,Partition,AllocTRES%35,State,Elapsed,ExitCode
sacct is especially useful after a job finishes because it shows accounting data that no longer appears in squeue, including elapsed time, exit code, and memory usage.
The exit_status attribute reported by sacct -j <jobid> --format=JobID,ExitCode can help users identify why a job failed. Successful runs generally report exit_status=0. Non-zero status (positive or negative) sometimes implies job failure, but the exact meaning of exit codes varies by software. Some discussion of how the error codes are handled can be found on Job exit status; a page developed by SchedMD.
To cancel a submitted job, use the scancel command:
scancel jobIDnumber
Replace jobIDnumber with the appropriate job ID number determined by using the squeue command.
For a full list of available directives, see the OPTIONS section of the sbatch command documentation. All options to sbatch can be specified as #SBATCH directives in a job script.
Fairshare
In a perfect world, we would provide unlimited compute resources, and every job would start instantly. In reality, demand almost always exceeds our capacity. Fairshare is the primary mechanism Slurm employs to manage this scarcity, ensuring equitable access across the user base. Rather than just being a ‘first-in, first-out’ queue, Fairshare dynamically adjusts job priority based on recent consumption. This means that groups that have used more resources will have lower priority for waiting jobs than groups that have used less.
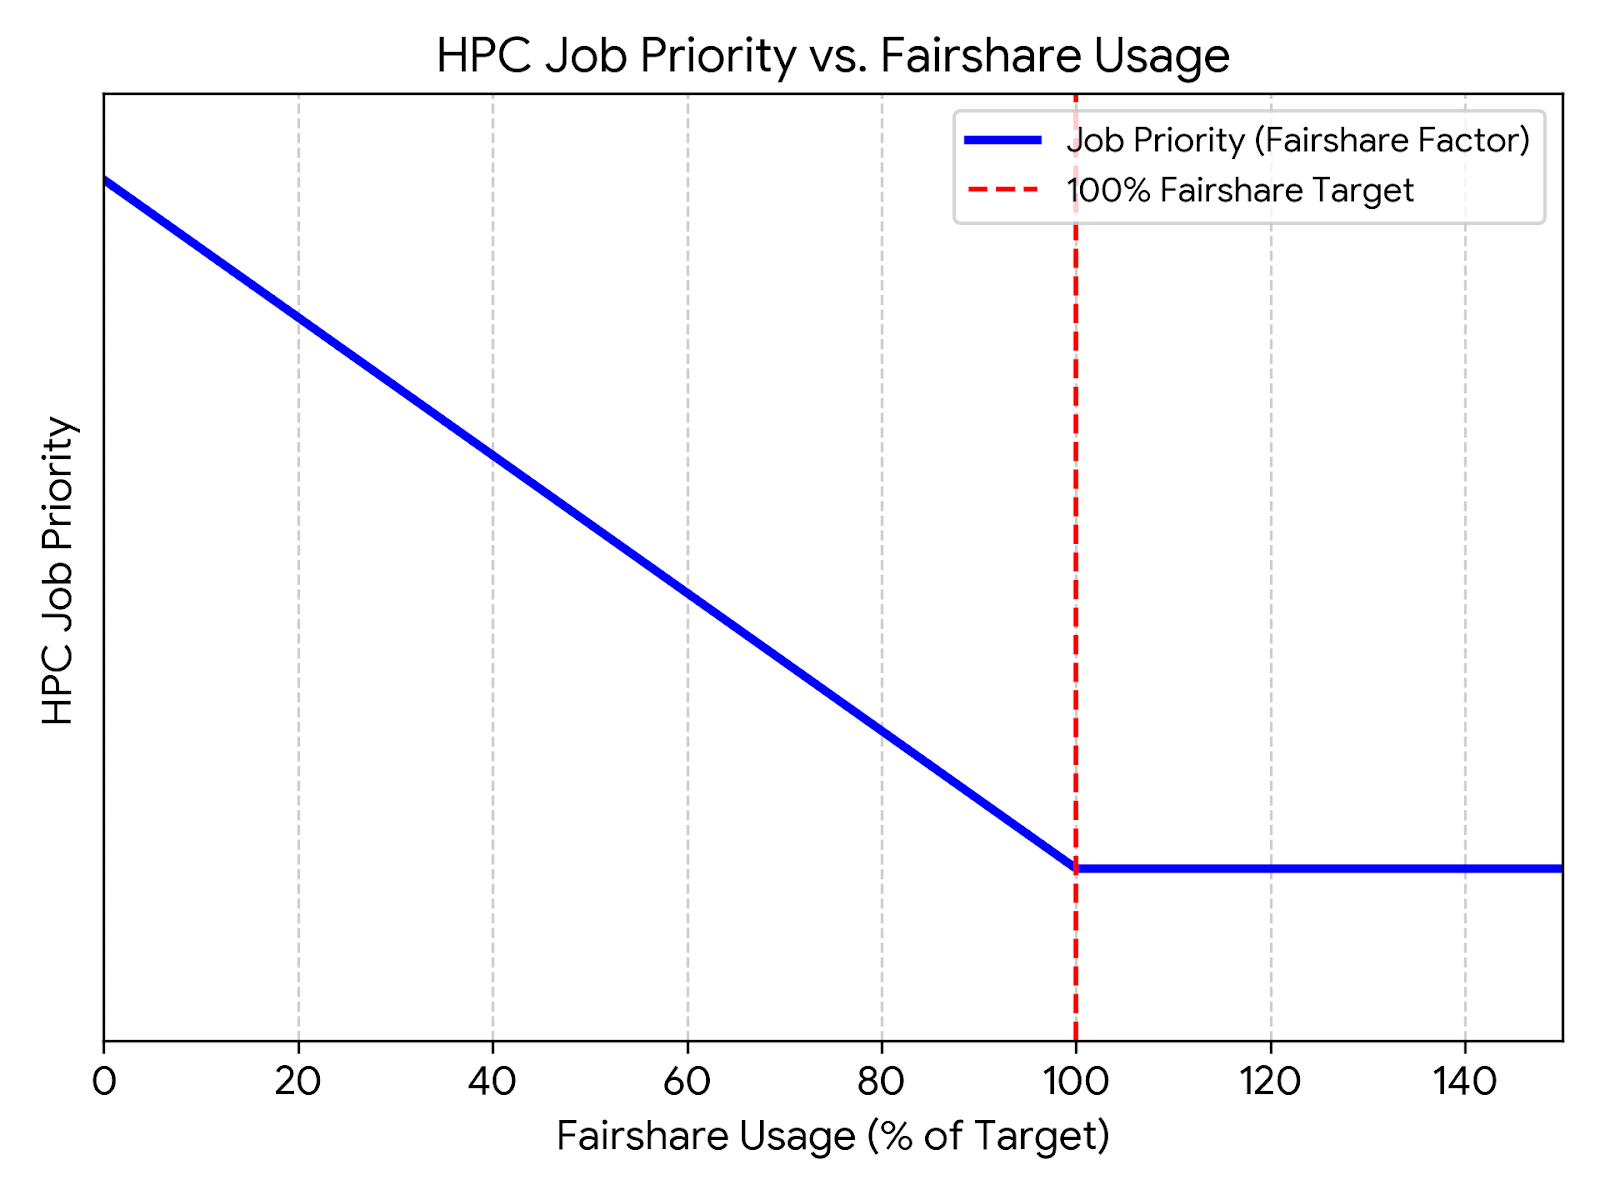
Fairshare is governed by your group’s target share of cluster resources, which is based on your group’s size compared to the number of recently active MSI users. As a group approaches 100% of this target, the priority boost provided by Fairshare diminishes to zero. However, groups may exceed their allocation if the cluster is under-utilized or if their workloads are eligible for backfilling—a scheduling optimization that utilizes idle resources to run shorter, smaller jobs without delaying higher-priority tasks.
The consumption of cluster resources is tracked through a process called Billing.
Billing Rates: Each resource type, cores, memory, and GPUs, is assigned a specific billing rate. Your group’s Fairshare account is billed per minute for each resource allocated to an active job. Newer hardware is billed at a higher rate.
Calculating the Utilization: Slurm aggregates these billing units into a Raw Usage total. This value is then normalized against the total usage of all groups on the cluster. By comparing this normalized fraction against your group’s assigned target share, Slurm determines your utilization for the priority calculation.
Right Sizing Jobs: It is important to only request resources your job needs in order to limit the fairshare utilization cost of your jobs.
Decay: The aggregate bill for resources decays with a half life of 10 days. Slurm will decay Raw Usage every 5-10 minutes by an amount that will have this value halved after 10 days if no more use occurs. If you have a utilization of 200%, it will take 10 days for that utilization to fall to 100%.
Use of Dedicated Computing nodes does not increase fairshare utilization, these resources are billed with a zero multiplier.