SSH Keys
Why SSH Keys
When connecting to MSI systems, such as the Agate login nodes, via SSH, users are required to authenticate with their password and complete a Duo challenge by default. SSH keys enable users to utilize public key authentication between a local machine and a remote system. This allows users to reliably connect to remote MSI systems using a trusted key rather than password-based authentication.
Setting up remote keys requires that your local machine be connected to the UMN network. This can be accomplished either by being connected to the campus eduroam Wi-Fi, campus LAN, or using UMN Cisco Secure Client.
Set up SSH keys using command line
Set up SSH keys with PuTTY (Windows)
Set up SSH keys using command line
Before Getting Started
It is assumed that you are working with a laptop or desktop with SSH version 6.5 or newer installed. The latest releases of macOS and Windows, and most Linux systems, include versions of SSH that meet this requirement.
You may check the version installed locally with the command:
ssh -V
This page walks through the process of:
Setting up an
~/.sshdirectoryGenerating a new set of keys with
ssh-keygenConfiguring local SSH to utilize keys
Connecting to MSI systems using SSH keys
Setting up the ~/.ssh Directory
The ~/.ssh directory is the default location where user-specific configuration and authentication files are kept. The first step of SSH configuration is to create the directory.
Creating the ~/.ssh Directory
If you already have an ~/.ssh directory, skip to the ~/.ssh/config section.
macOS and Unix-like systems
Press
Command+Spaceto launch Spotlight, search forTerminal, and pressEnterto launch the application.Type the command
mkdir -v -m 700 ~/.sshmkdircreates directories.-vmakesmkdirverbose when creating the directory.-m 700sets permissions to700, so only the current user has access to the directory.~/.sshspecifies the path to the directory that will be created.
# Example output
hofst127@macbook-pro:~ $ mkdir -v -m 700 ~/.ssh
mkdir: created directory '/Users/hofst127/.ssh'
hofst127@macbook-pro:~ $
Windows
From the taskbar, select the Windows icon to launch the Start menu. Search for
Terminaland launch the application.Type the command
mkdir $HOME/.ssh
Now that the ~/.ssh directory is present, move on to creating SSH keys below.
Generating SSH Keys
SSH keys should be generated with identifiers such as who the key is for, where it is used, and when it was created. This information helps you audit keys long after they have been created.
The key generation process creates two files:
Private key: the secret key, stored in a file with no file extension.
Public key: the file name matches the private key and ends in
.pub.
Public keys have three sections:
Key type
Public key string
Comment
It is recommended to set a meaningful comment that includes:
Internet ID for your user
Name of your local machine and its ID number
Date of creation
Within the command line on macOS and Windows, follow the steps below. Substitute internetID with your UMN Internet ID, which is your University email address without @umn.edu. The file name should correspond to the system the key is intended for so it is easier to differentiate between existing keys.
Navigate to the
.sshdirectory with the commandcd ~/.sshEnter the command below, replacing the placeholder values in angle brackets with your own:
ssh-keygen -t ed25519 -f <internetID>-msi-agate -C "<internetID>@<UMN_Laptop_ID-12345> Created on <date>"
In the example below, we replace:
<internetID>withvega0051<UMN_Laptop_ID-12345>withinfra04-wg012<date>withMarch 23 2026
# Example output
[vega0051@infra04-wg012 ~/.ssh ]$ ssh-keygen -t ed25519 -f 'vega0051-msi-agate' -C 'vega0051@infra04-wg012 Created on March 23 2026'
Generating public/private ed25519 key pair.
Enter passphrase for "vega0051-msi-agate" (empty for no passphrase):
Enter same passphrase again:
Your identification has been saved in vega0051-msi-agate
Your public key has been saved in vega0051-msi-agate.pub
The key fingerprint is:
SHA256:Hc2EQE3e4p0OFSaLn+Cq8Y0XcqfXKPDy4B+mT49r00o vega0051@infra04-wg012 Created on March 23 2026
The key's randomart image is:
+--[ED25519 256]--+
|       .o+o.+    |
|         ooO .   |
|        o = =    |
|       . = * .   |
|        S * o    |
|      o.o .o     |
|    . o=E= o.    |
|     =.OB++ .    |
|    . =BO*.      |
+----[SHA256]-----+
Now that the key pair has been created, you can make modifications to the ~/.ssh/config file to ensure the appropriate key is used when connecting.
Configuring ~/.ssh/config
This is the per-user configuration file where you will add a section for connecting to MSI systems. For additional information on the file format and configuration options, see the OpenSSH ssh_config man page.
macOS and Linux
Open
Terminal.Create or open the configuration using the command
open ~/.ssh/config
Windows
Open
Terminal(PowerShell).Create or open the configuration file using the command
notepad $HOME/.ssh/config
The next steps apply to OpenSSH in general, so they are the same for macOS, Linux, and Windows.
Copy and paste sections from the contents below based on the systems you normally connect to.
Lines starting with # are comments and are not interpreted. They can be useful for notes about the significance of each line. If you are working on multiple remote systems that each have corresponding keys, such as Stratus or Blackwell, your configuration file may have sections such as this example:
## MSI SSH config ##

# Agate Compute
Host msi-login login.msi.umn.edu
  HostName login.msi.umn.edu
  User <internetid> # replace with your UMN internetid
  IdentityFile %d/.ssh/<private key for Agate>

Host acn* acl* cn* n* aga* agb* agc* agd* e* l*
  User <internetid> # replace with your UMN internetid
  ProxyJump msi-login

# Blackwell Compute
Host blackwell-login
  Host bwln01.blackwell.msi.umn.edu
  User <internetid> # replace with your UMN internetid
  IdentityFile %d/.ssh/<private key for Blackwell>

Host bw* !bwln*
  User <internetid> # replace with your UMN internetid
  ProxyJump blackwell-login

# Sky
Host sky-login
  Host sky.msi.umn.edu
  User <internetid> # replace with your UMN internetid
  IdentityFile %d/.ssh/<private key for Sky>
## MSI SSH config ##
Add SSH Key to MyMSI
Start by printing the contents of the public key, the file ending in .pub, using the command below. Replace the example key name with your actual key name.
cat $HOME/.ssh/internetID-msi.pub
# Example output
hofst127@macbook-pro:~/.ssh $ cat $HOME/.ssh/hofst127-msi.pub
ssh-ed25519 AAAAC3NzaC1lZDI1NTE5AAAAIFitL/wxMQuFSCTmcwInR+RpkPF44P11WIF3yrEk91Go hofst127@macbook-pro-12345 Created on March 04 2026
The above works on macOS, Linux, and Windows. In a web browser, visit the SSH Keys page on MyMSI.

Copy the contents of the key from your terminal, paste it into the text box, and press Add to save.
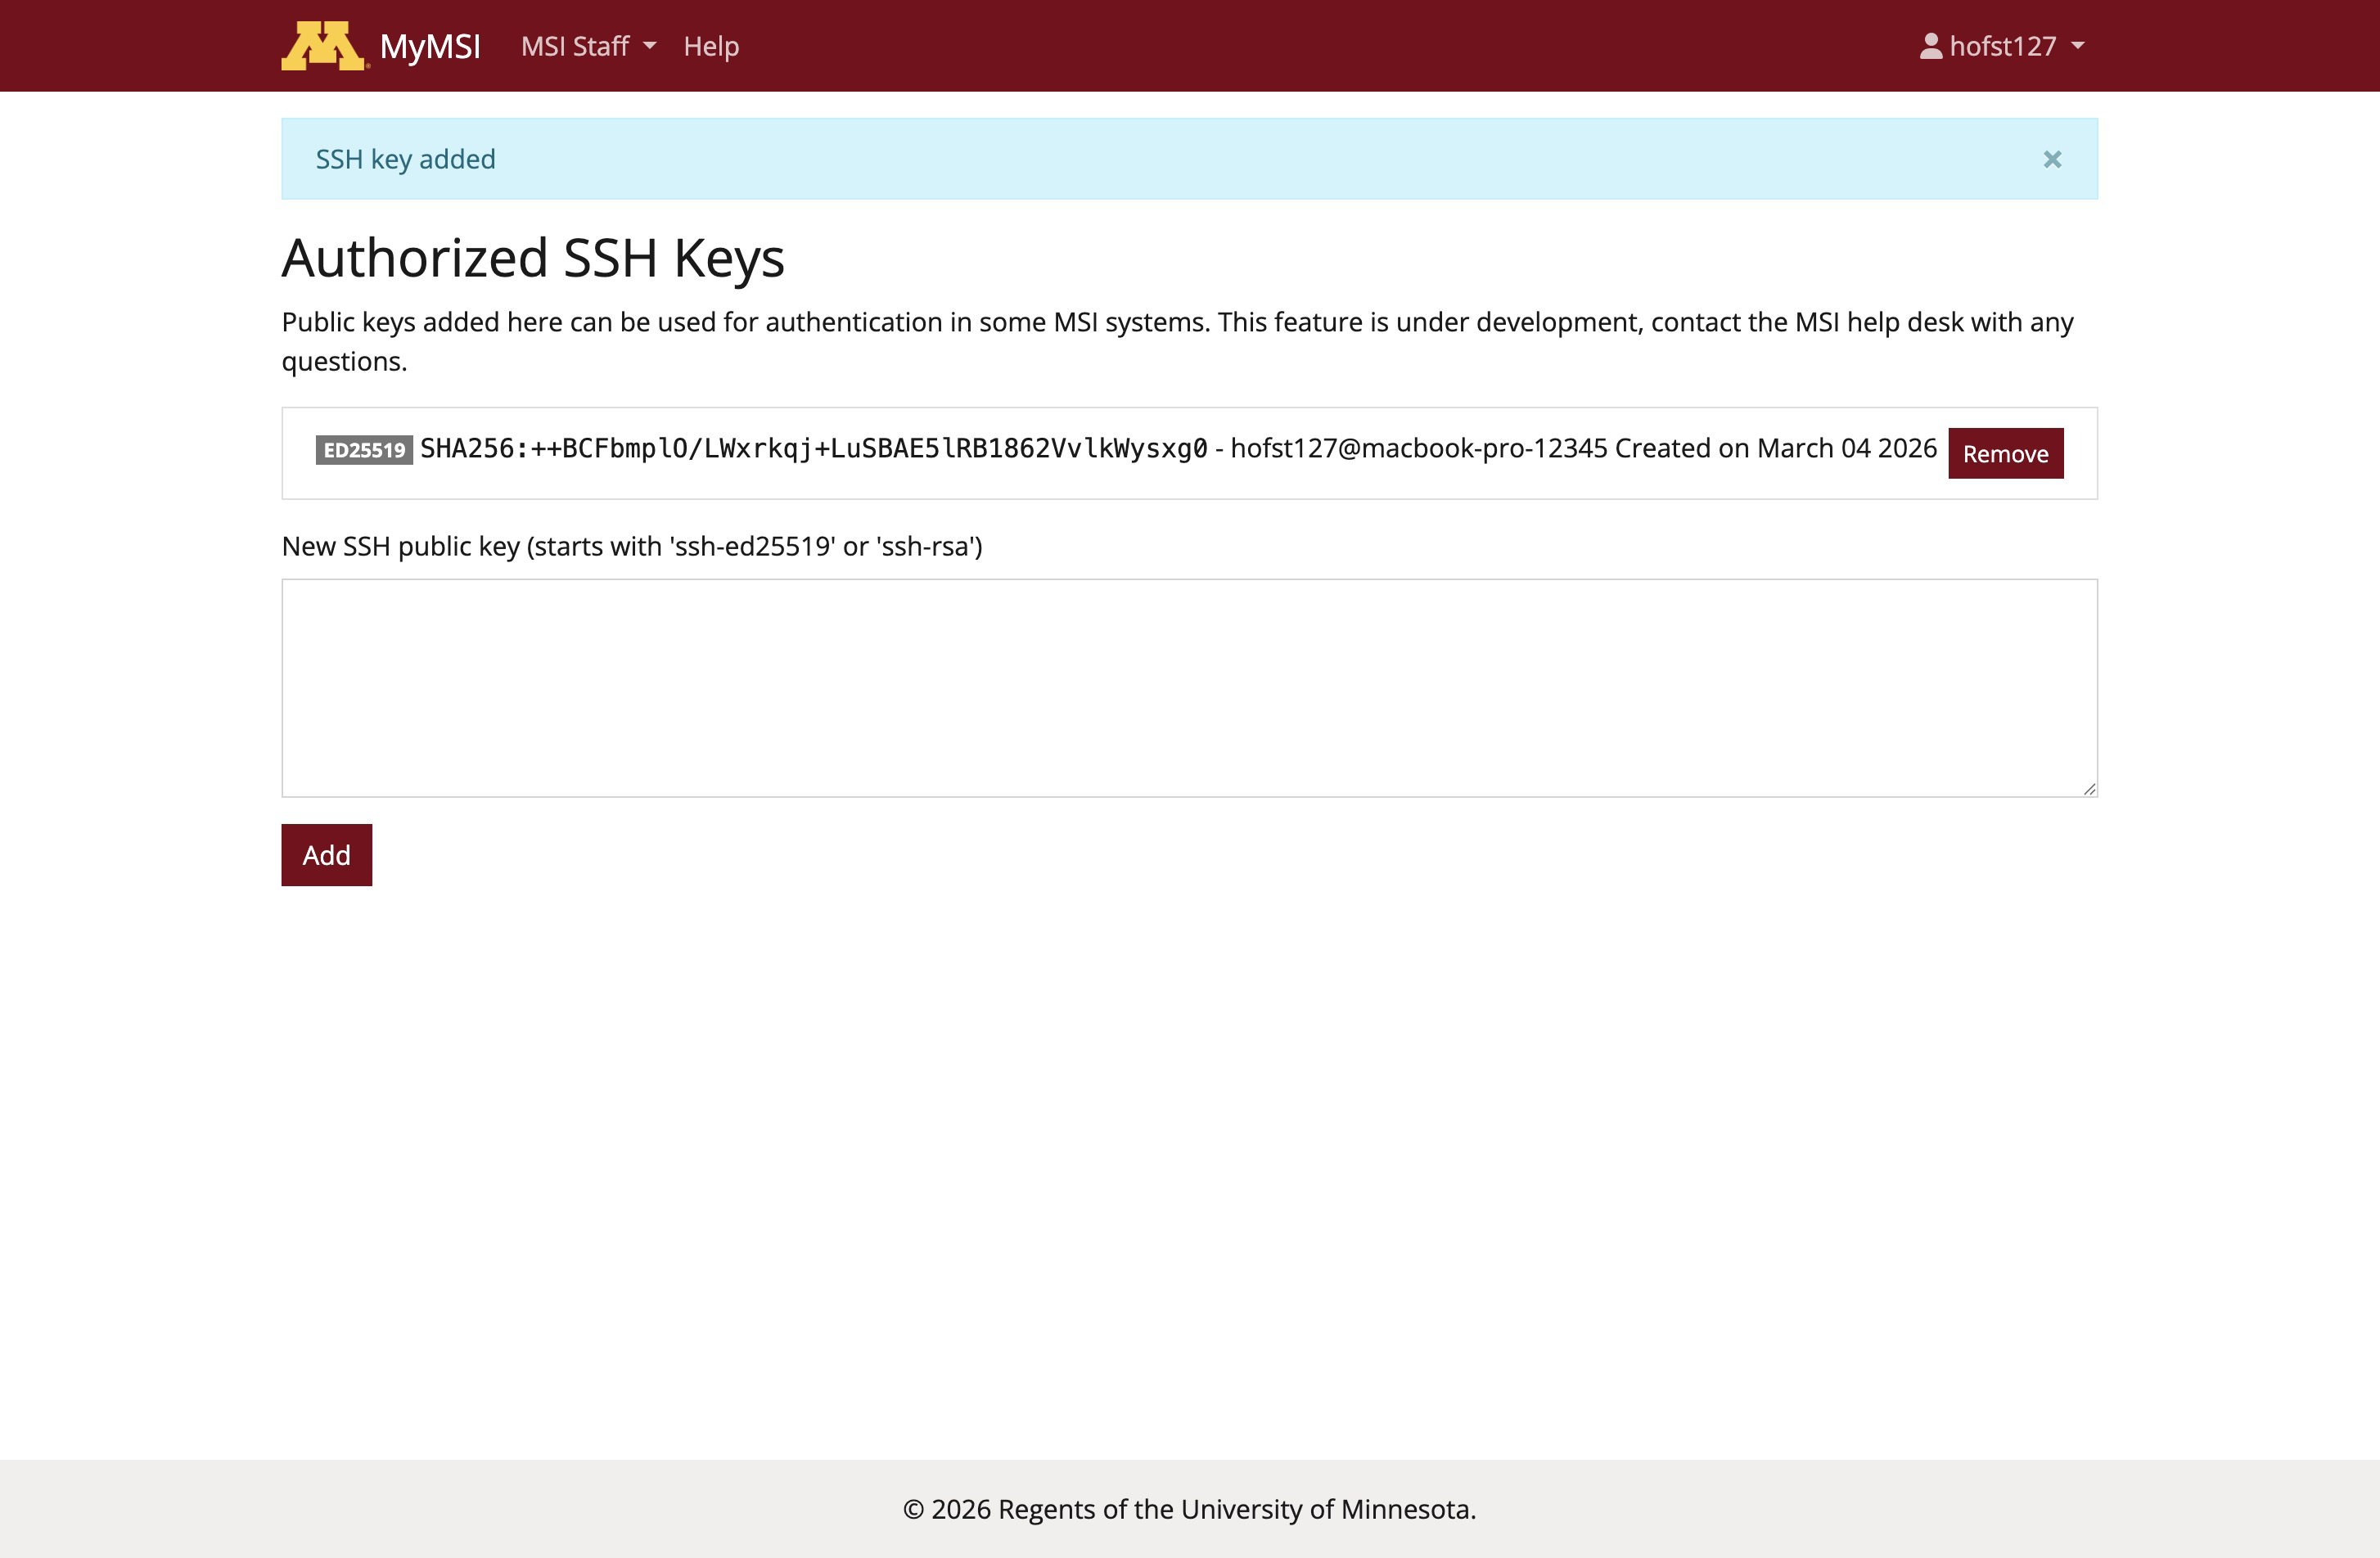
At the end of this stage, you will have added a copy of the public key to MyMSI. Now you can try connecting to verify by visiting the section below titled Test your SSH connection.
Start local SSH Agent (optional, advanced)
On your local machine, type these commands to ensure that the local ssh-agent is running. Then add the SSH key to the keychain.
macOS and Linux
Each invocation of ssh-agent starts a new agent, so do not run the following multiple times.
eval $(ssh-agent)
# Example output
hofst127@macbook-pro:~/.ssh $ eval $(ssh-agent)
Agent pid 65137
Windows
Open Terminal (PowerShell) as Administrator and run the following commands.
The following should only be run once. Also keep in mind that the Windows agent will never unload the SSH keys given to it, which can be a security concern.
Get-Service ssh-agent | Set-Service -StartupType Automatic -PassThru | Start-Service
start-ssh-agent.cmd
Add Private Key to SSH Agent
Add the private SSH key to the SSH agent. This approach works on Windows, Linux, and macOS.
ssh-add $HOME/.ssh/internetID-msi
# Example output
[vega0051@infra04-wg012 ~/.ssh ]$ ssh-add vega0051-msi-agate
Enter passphrase for vega0051-msi-agate:
Identity added: vega0051-msi-agate (vega0051@infra04-wg012 Created on March 23 2026)
Confirm the key is added:
ssh-add -L
# Example output
[vega0051@infra04-wg012 ~/.ssh ]$ ssh-add -L
ssh-ed25519 AAAAC3NzaC1lZDI1NTE5AAAAIHKyAbC4wewIqUhDGRE0QheaJOgCuB1kBuVE32tu+uJP vega0051@infra04-wg012 Created on March 23 2026
At the end of this stage, you will have added the secret key to the local SSH agent.
Test your SSH connection
macOS and Linux
Open
Terminal.Follow the common steps for all operating systems below.
Windows
Open application search, press the Windows key, and search for
Terminal.Follow the common steps for all operating systems below.
Common steps for all operating systems
Enter the command, replacing
internetIDwith your Internet ID:
ssh internetID@msi-login
Complete the Duo prompt.
You have now connected with SSH keys.
If you used the ~/.ssh/config snippets shared here, you can also use the command ssh msi to connect.
If you are prompted for your password, not the key passphrase, then something is not configured correctly. To confirm, you can force the SSH connection to use key authentication by using the following version of the command instead. Replace internetID with your UMN Internet ID.
ssh -o HostbasedAuthentication=no -o PubkeyAuthentication=yes -o KbdInteractiveAuthentication=no -o PreferredAuthentications=publickey internetID@login.msi.umn.edu
Set up SSH keys with PuTTY (Windows)
Using PuTTY on Windows
PuTTY is a Windows SSH client that can be used instead of the built-in OpenSSH tools. If you prefer a graphical interface for saved sessions and key selection, PuTTY is a good option for connecting to MSI systems. The PuTTY suite also includes PuTTYgen for key generation and Pageant for SSH key management.
Install PuTTY
Start by downloading and installing the current PuTTY release for Windows from the official PuTTY download page. During installation, make sure the suite includes PuTTY, PuTTYgen, and Pageant.
Generate an SSH Key with PuTTYgen
Use PuTTYgen to create a key pair for MSI access.
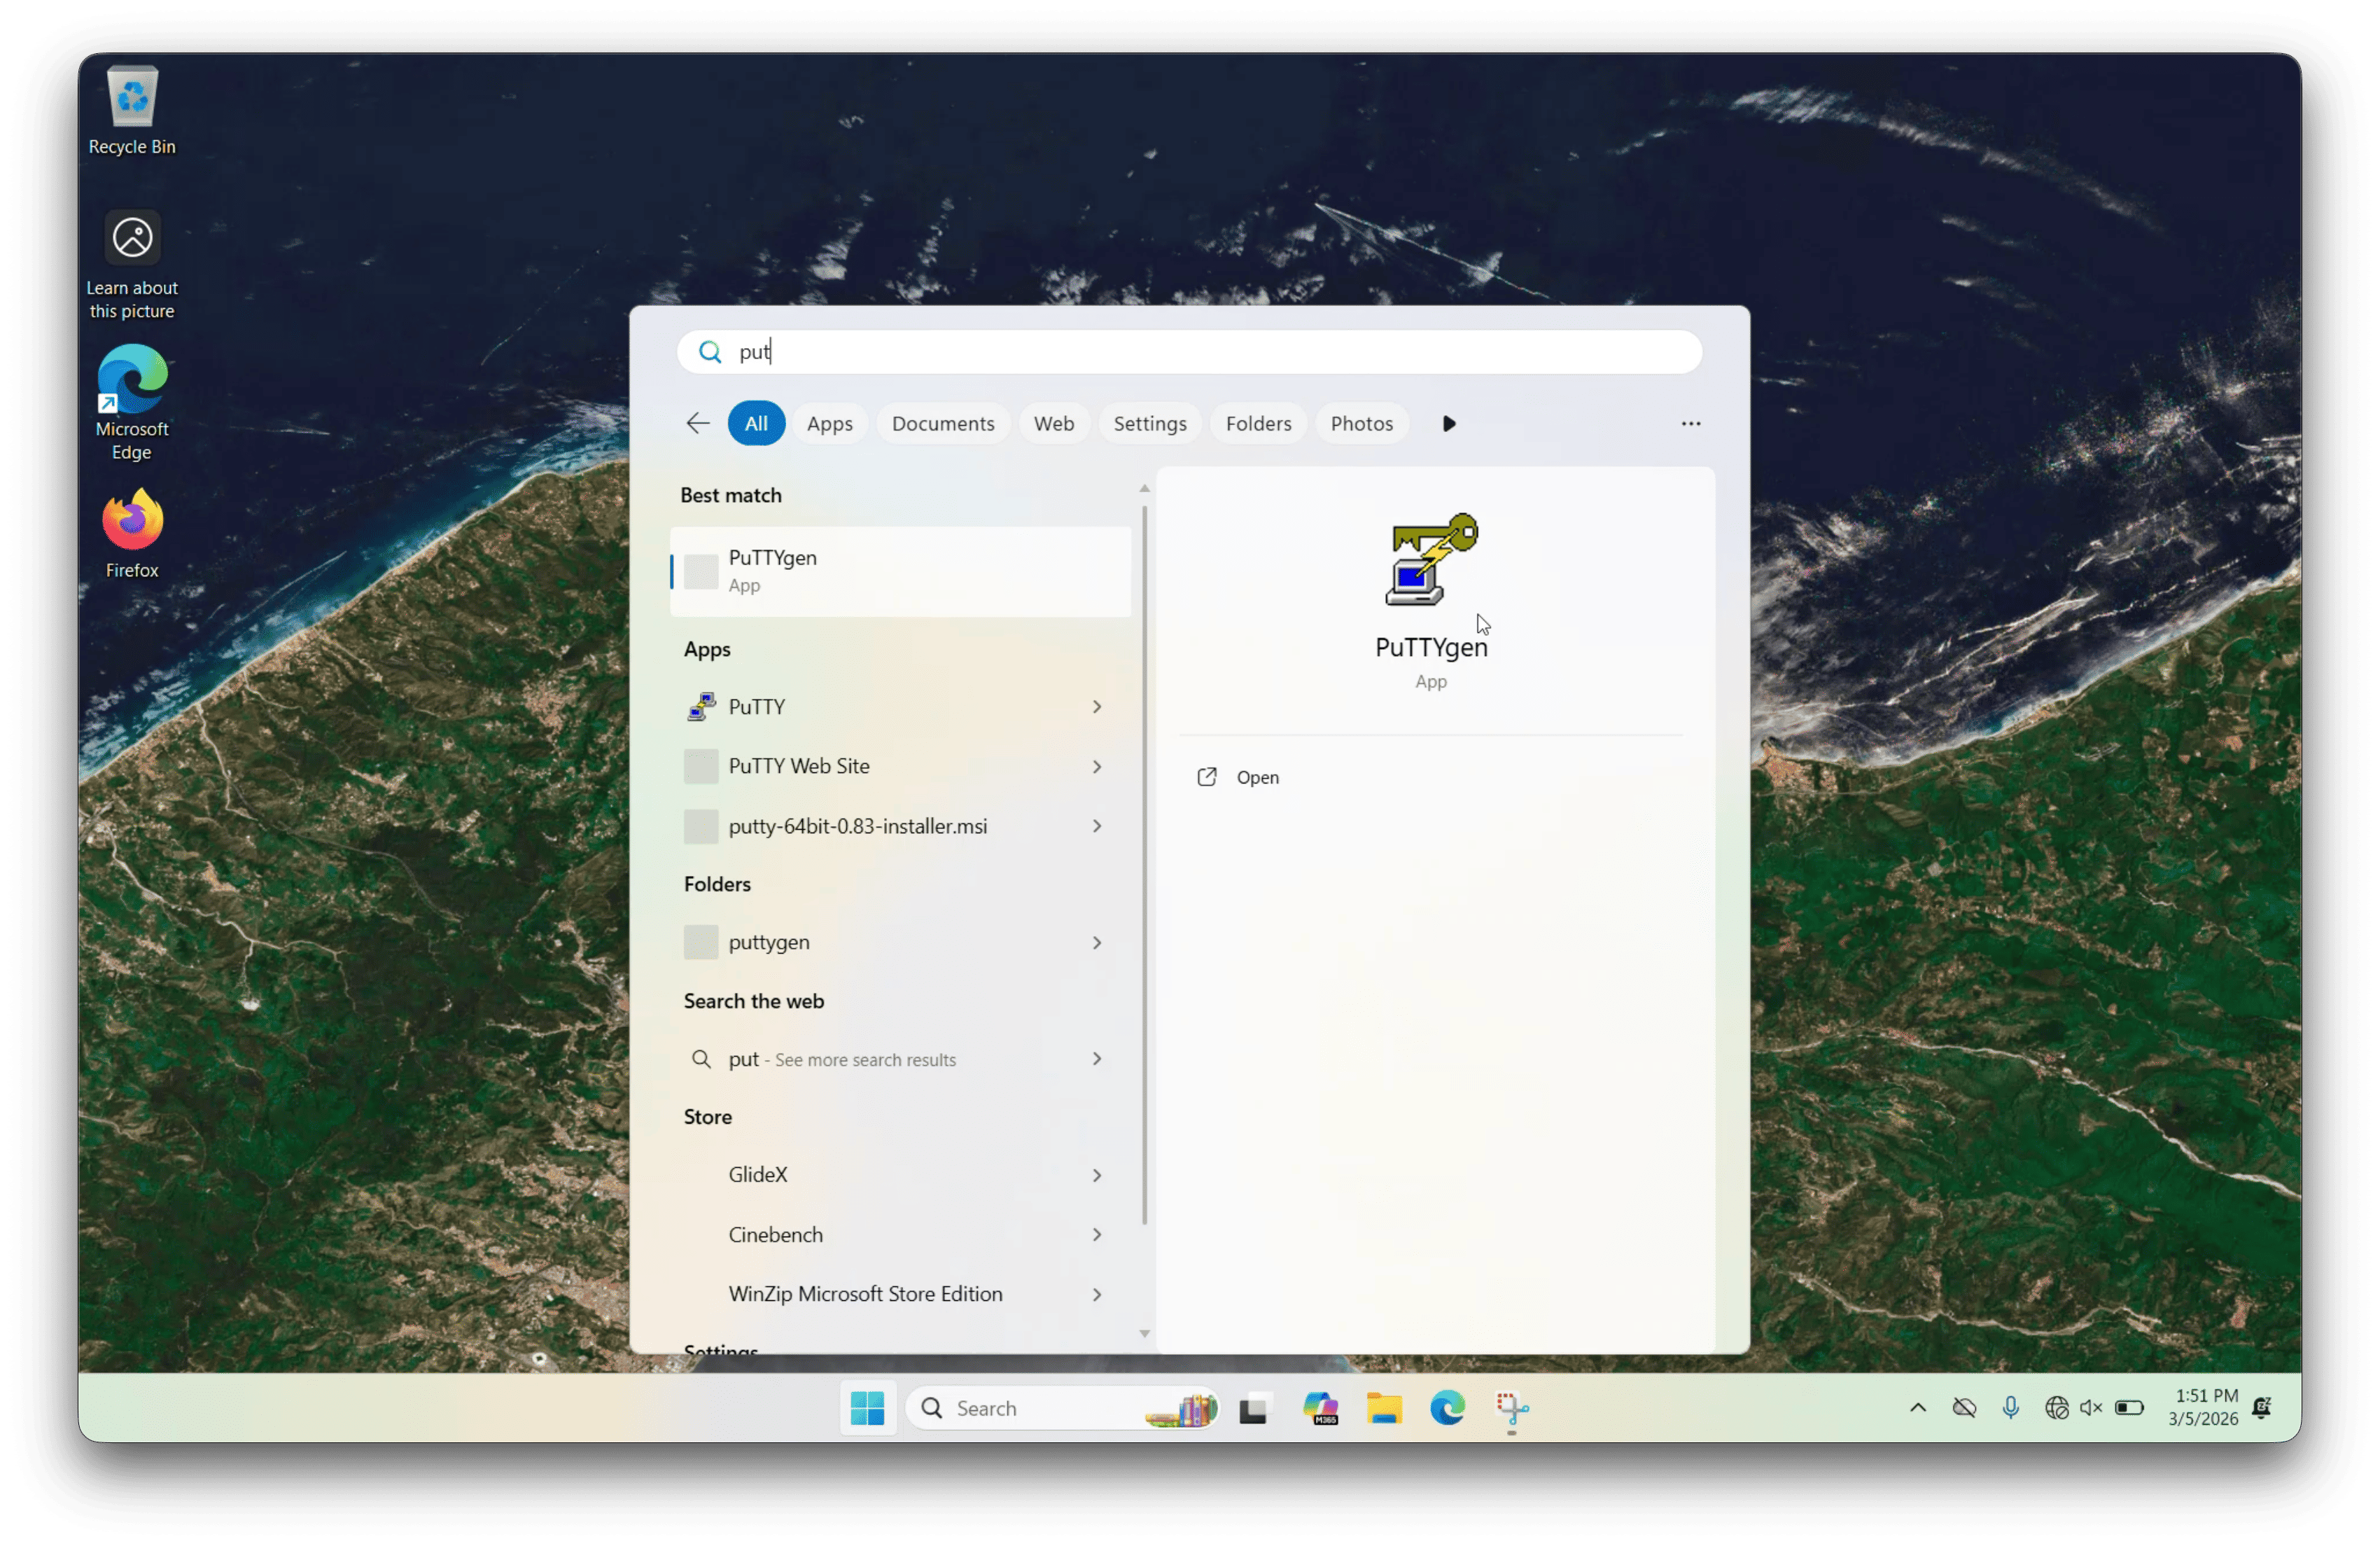
Open the Start menu and search for PuTTYgen.
Launch the application.
Under Parameters, select EdDSA and choose Ed25519 (255 bits).
Press Generate.
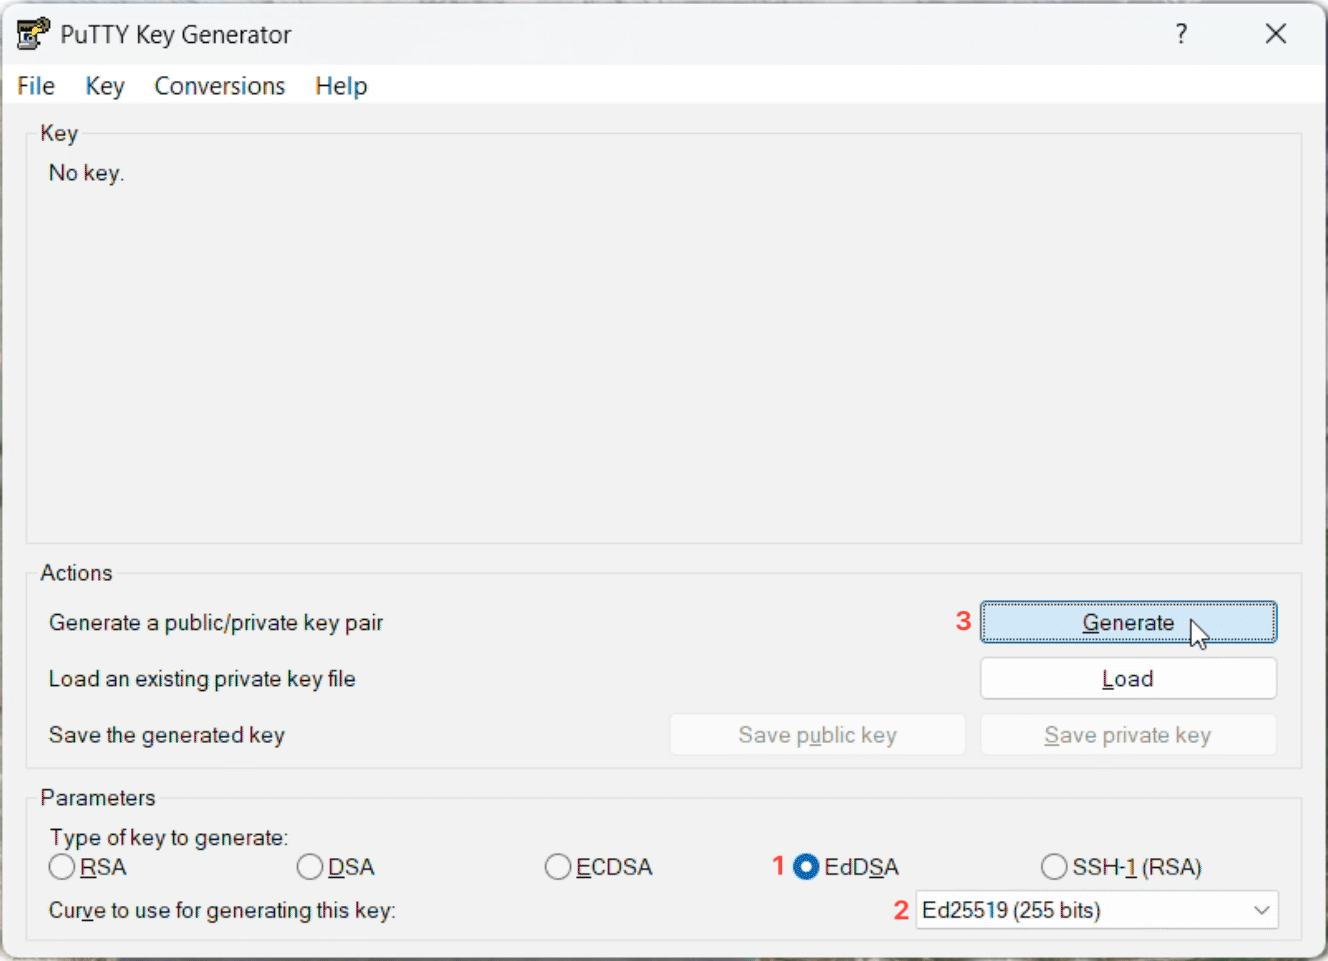
Move the mouse within the blank area of the PuTTYgen window until key generation completes.
In the Key comment field, enter a descriptive label that identifies:
your UMN Internet ID
the local machine name or asset tag
the date the key was created
Enter and confirm a passphrase.
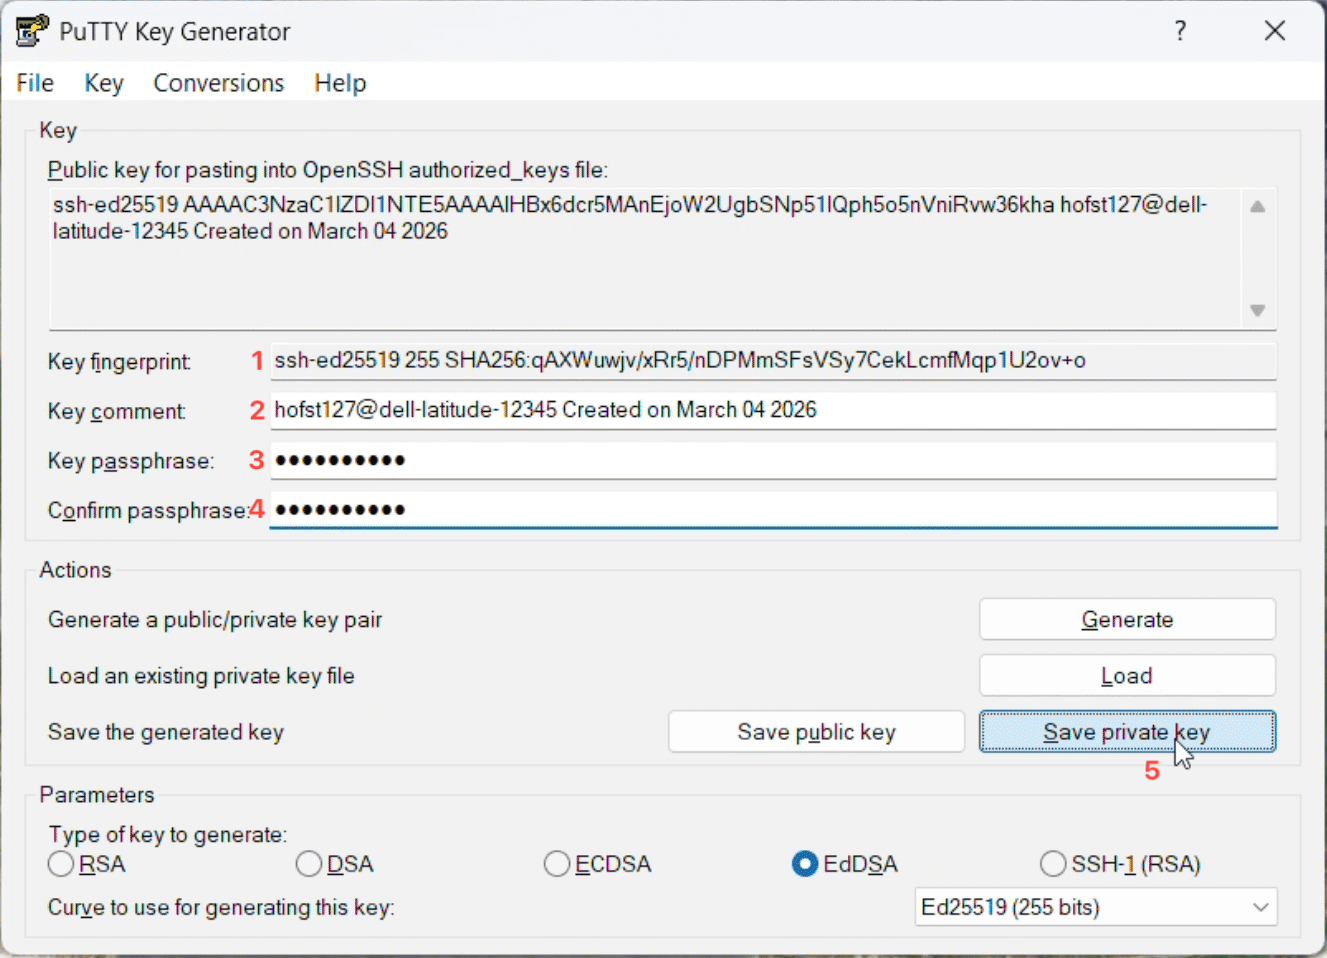
Press Save private key and save the file somewhere in your user directory, such as:
C:\Users\local_username\.ssh\internetID-msi.ppk
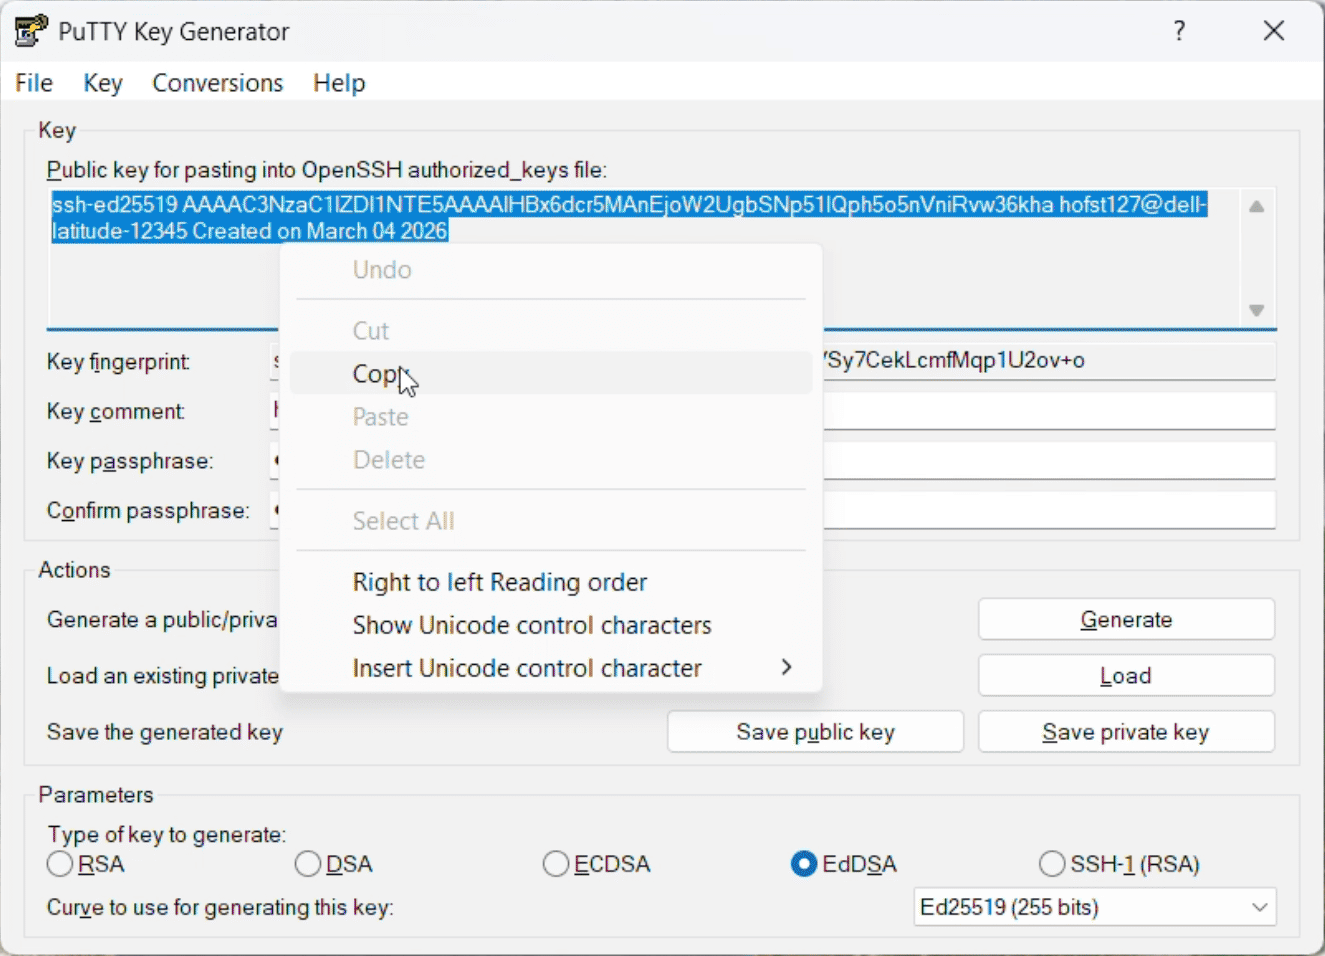
Copy the contents from the box labeled Public key.
If you already created a key with OpenSSH earlier in this tutorial, PuTTY cannot use that private key file directly. Instead, open PuTTYgen, use Conversions -> Import key or Load, depending on the file, and then save it as a PuTTY .ppk file.
Add the Public Key to MyMSI
After generating the key in PuTTYgen:
Copy the full contents of the Public key box.
In a web browser, visit the SSH Keys page on MyMSI.
Paste the key into the text box.
Select Add to save it.
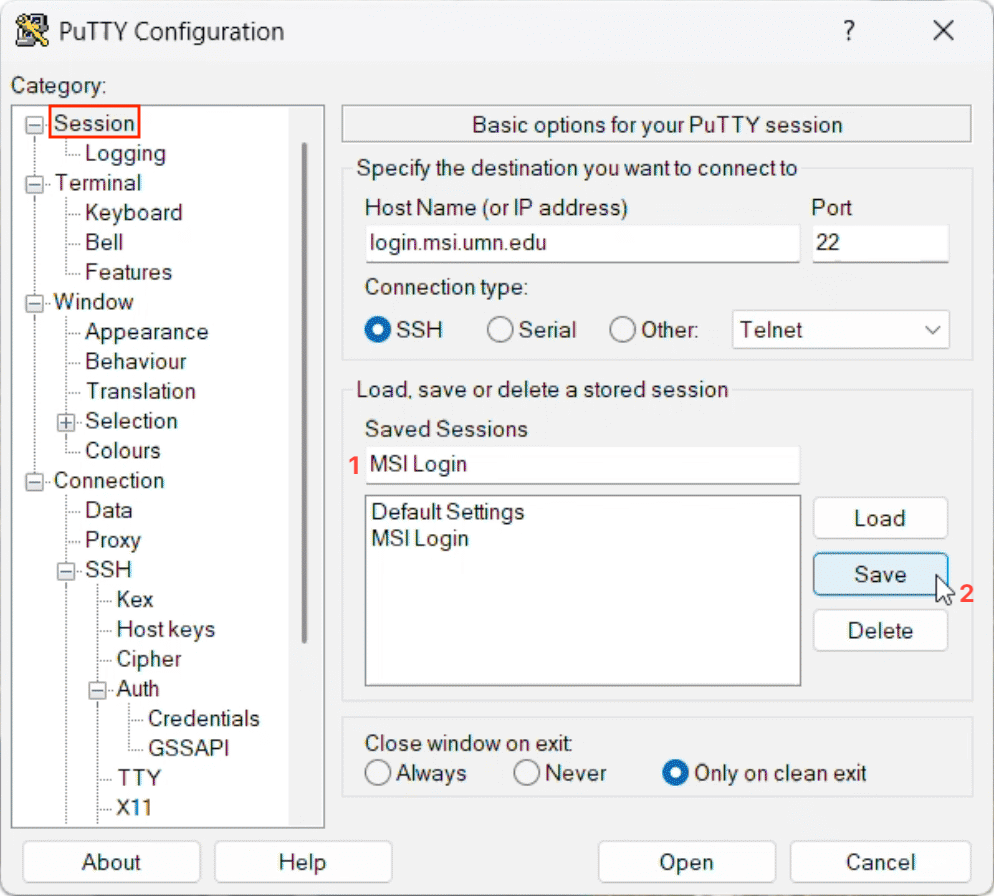
Configure a Saved PuTTY Session
Now, create a saved PuTTY profile for MSI.
Open the Start menu and search for PuTTY.
Launch the application.

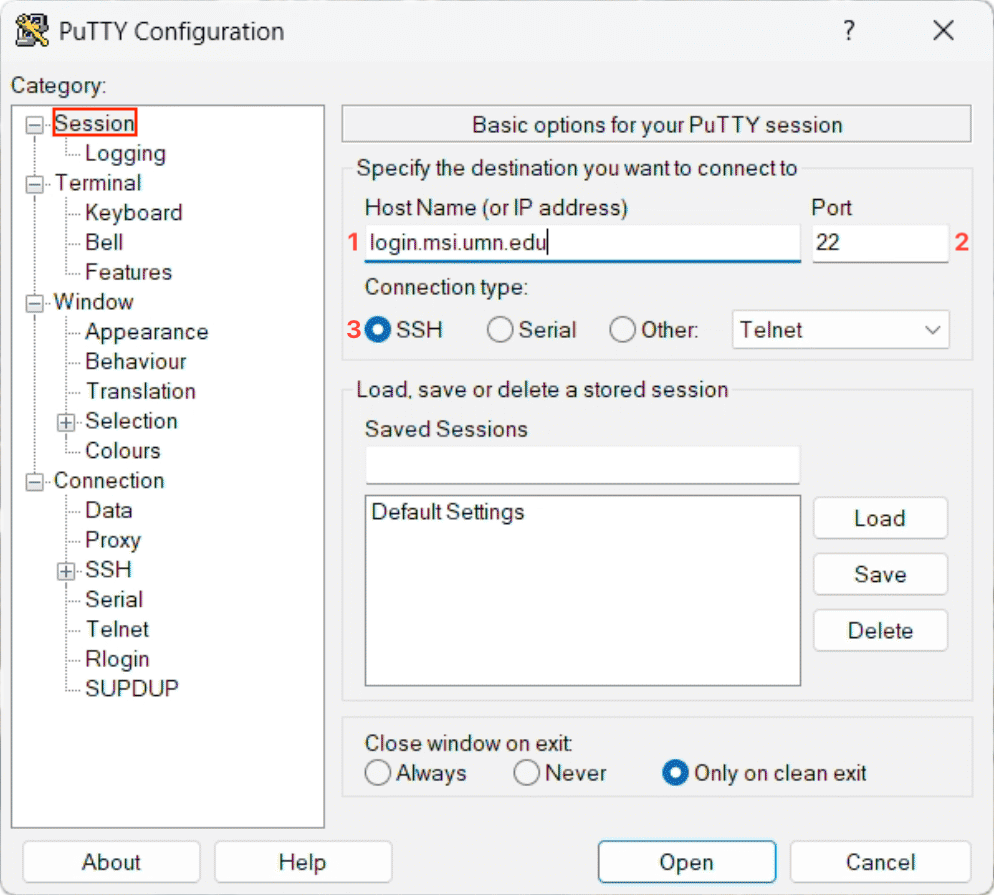
In the Session category:
In Host Name (or IP address), enter
login.msi.umn.eduConfirm Port is set to
22Confirm Connection type is set to SSH
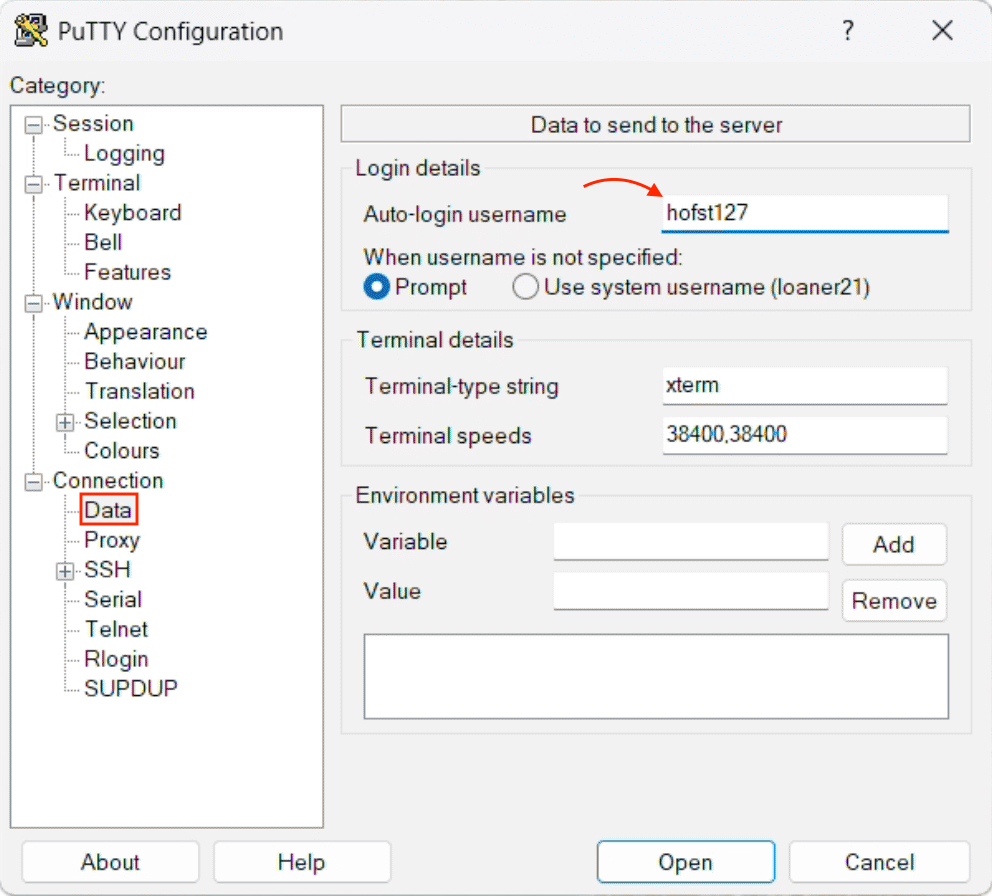
In the category tree on the left, go to Connection -> Data.
In Auto-login username, enter your UMN Internet ID.
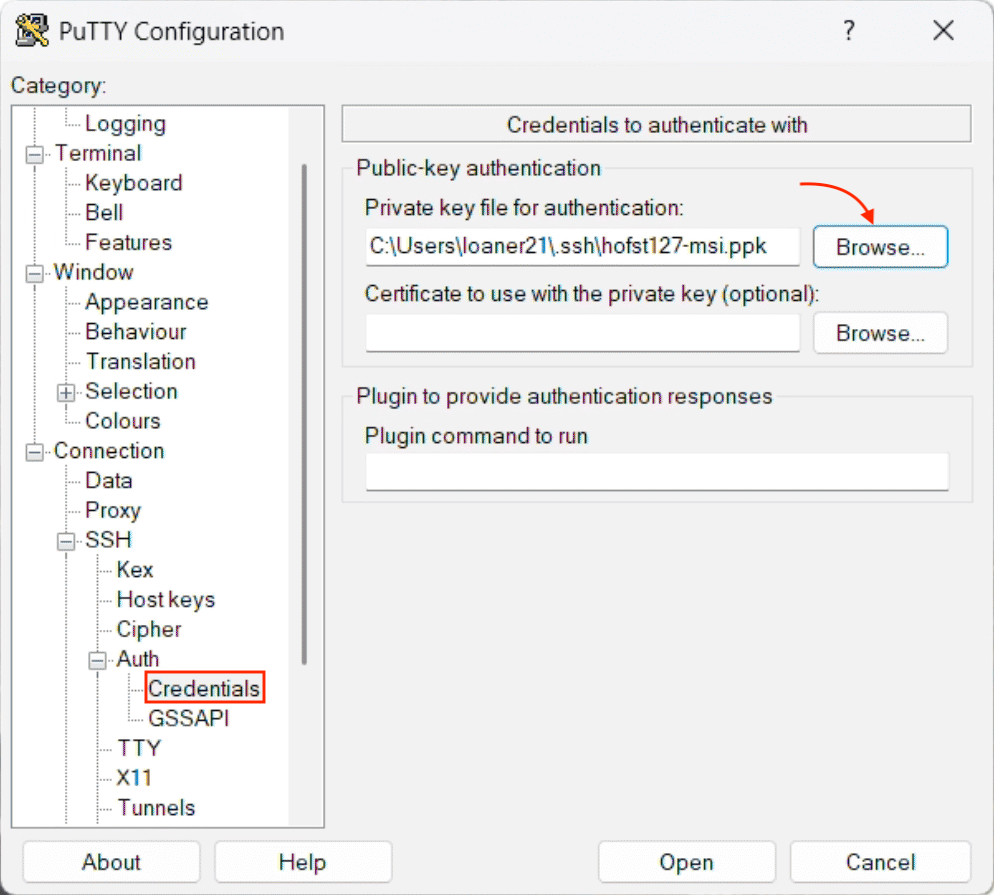
Then go to Connection -> SSH -> Auth -> Credentials.
In Private key file for authentication, browse to and select your
.ppkfile.
Return to the Session category:
In Saved Sessions, enter a name such as
MSI LoginSelect Save
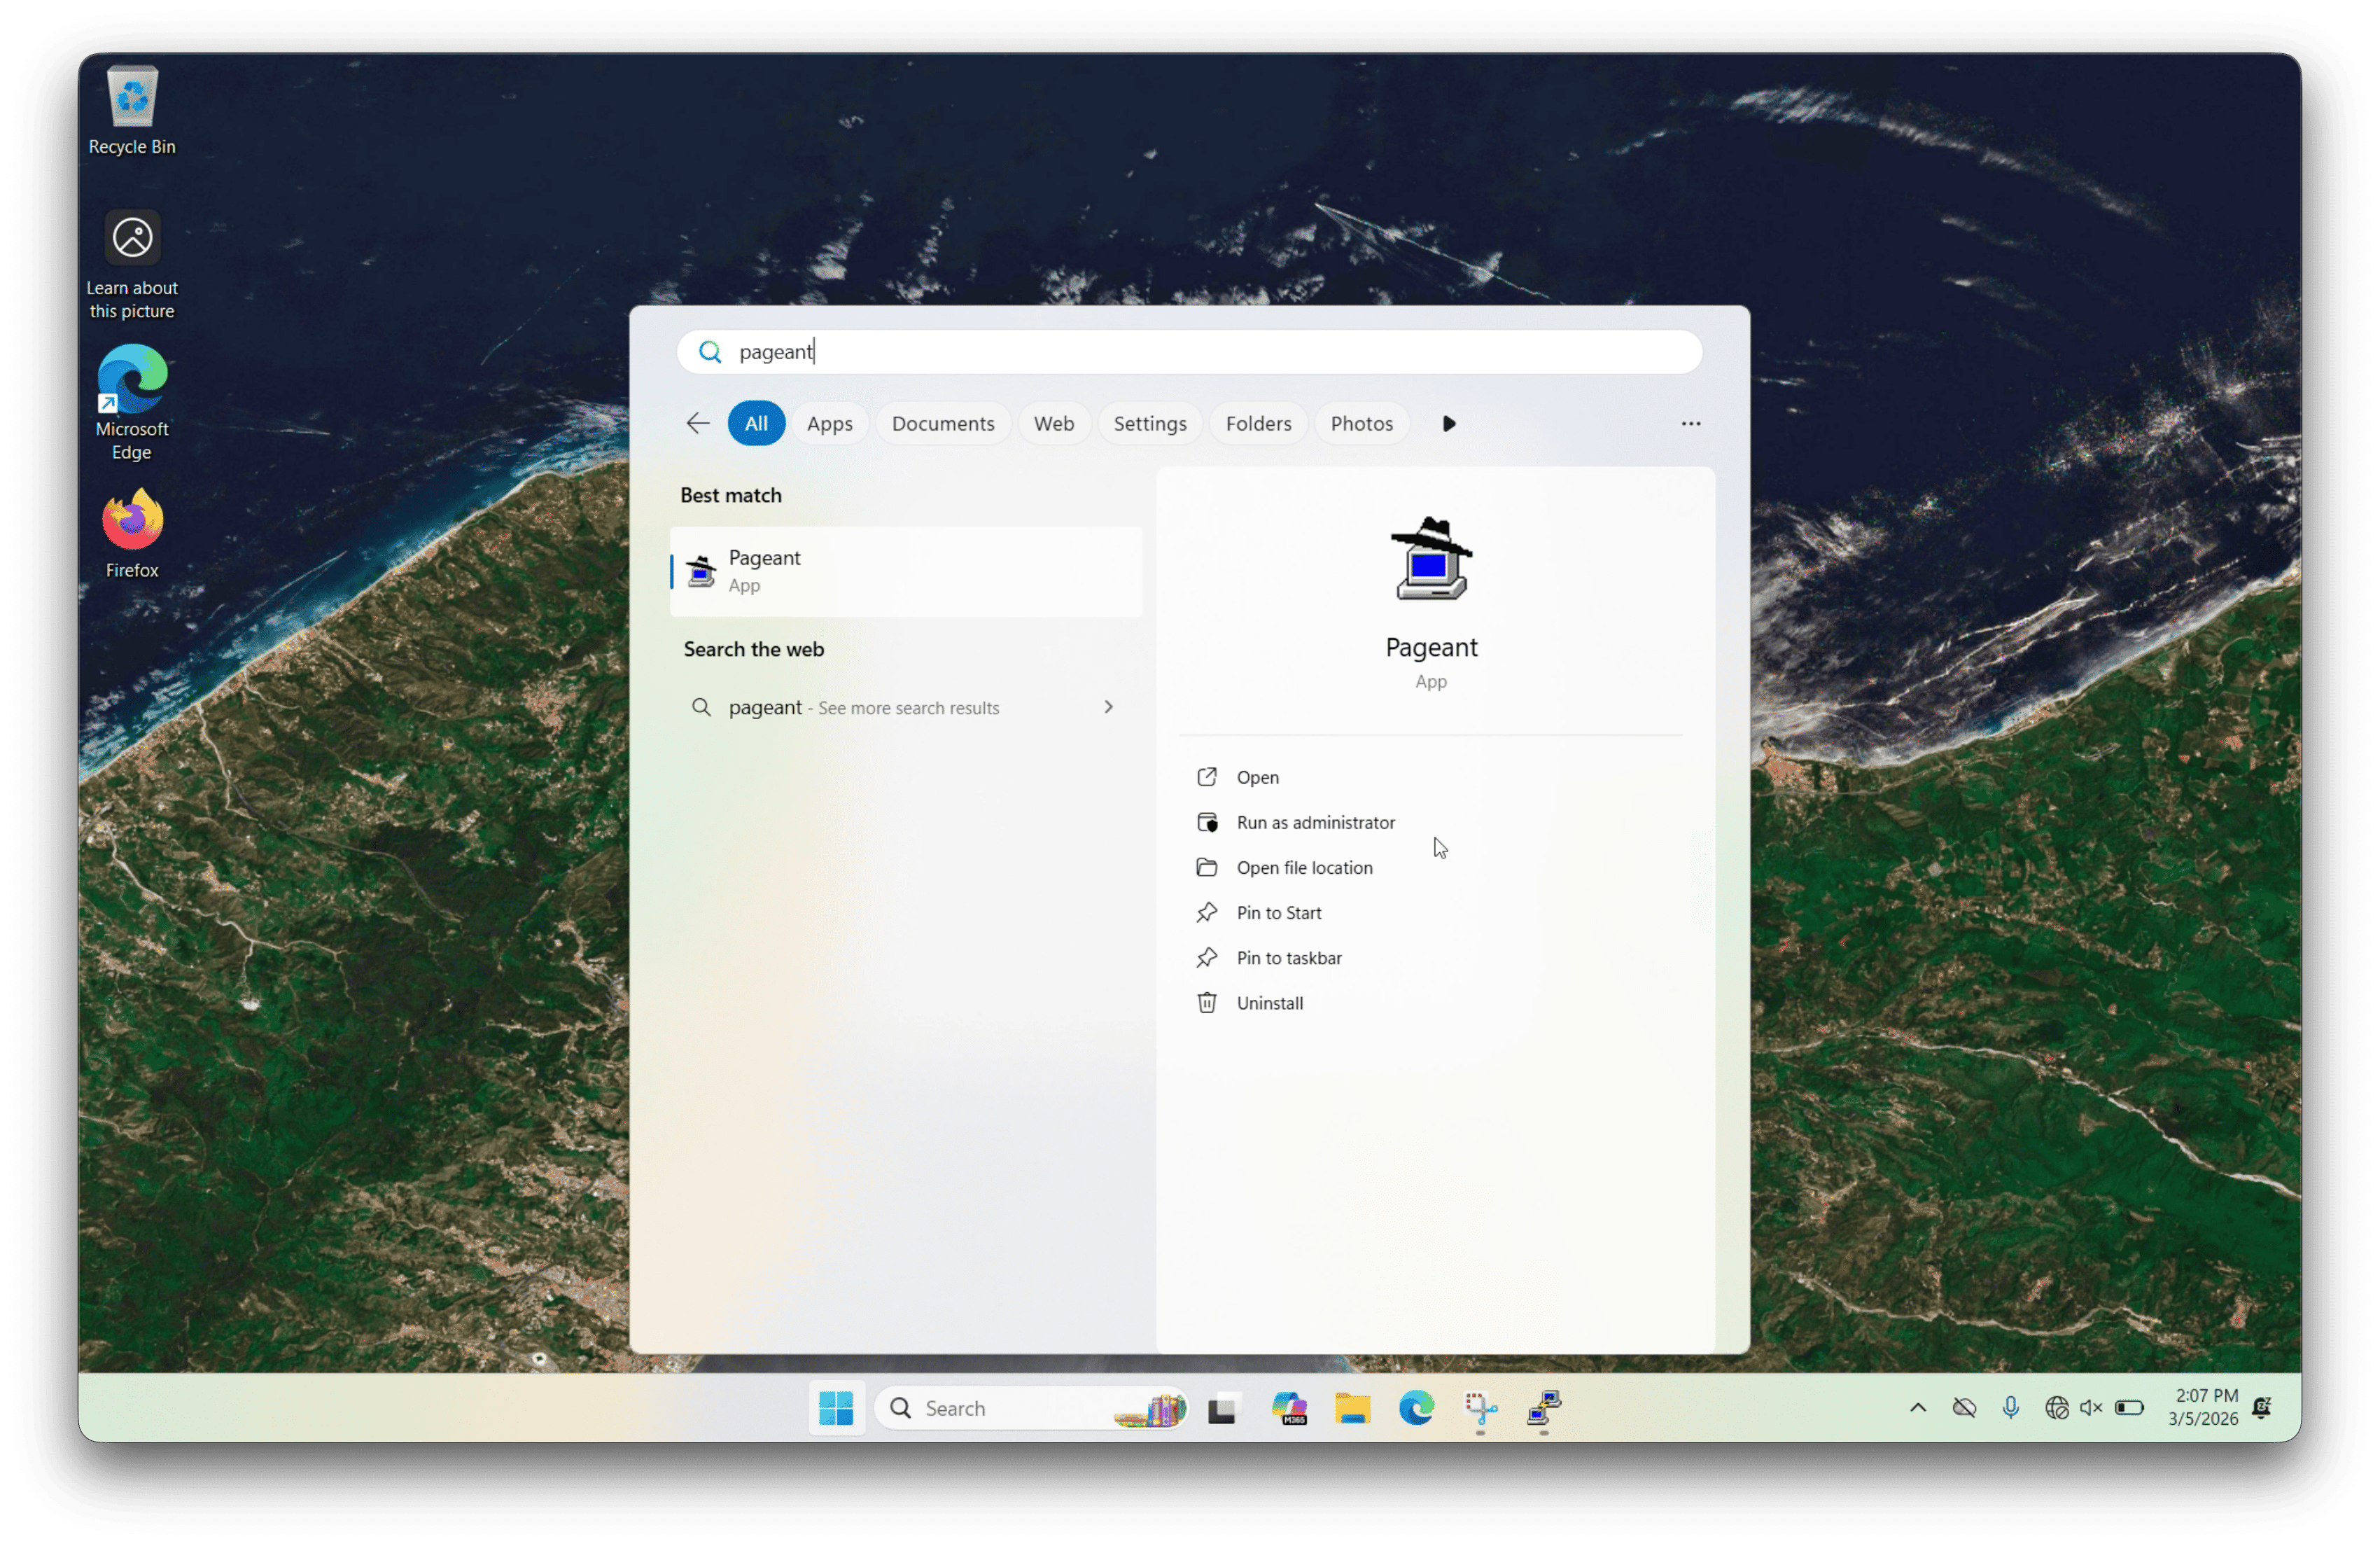
Start Pageant and Load the Private Key
If you want to enter your passphrase once and reuse the key for multiple sessions, use Pageant.
Open the Start menu and search for Pageant.
Launch the application.
Use Pageant to add your
.ppkprivate key.
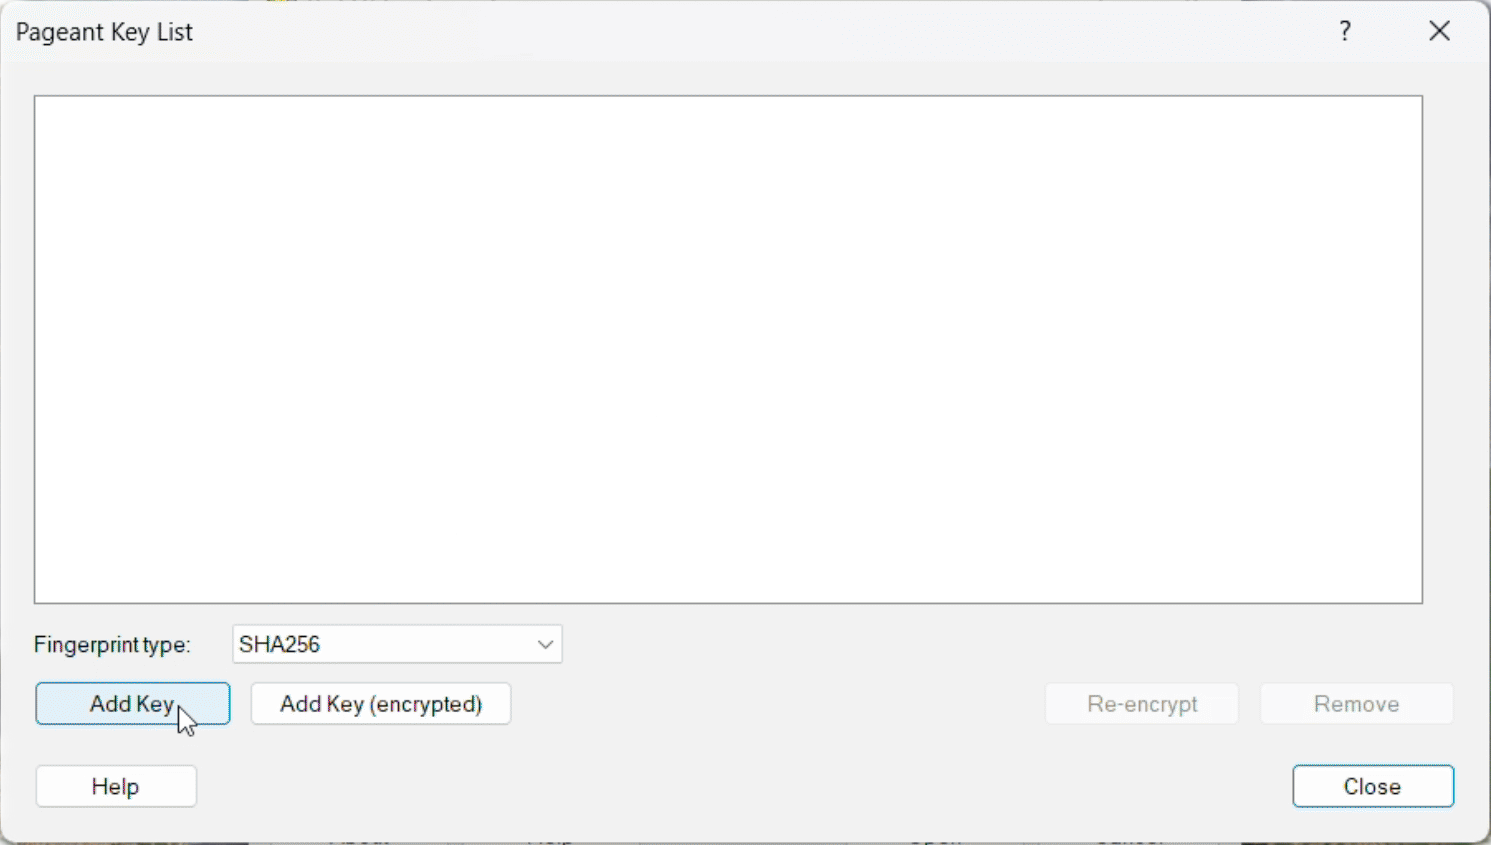
Enter your passphrase when prompted.
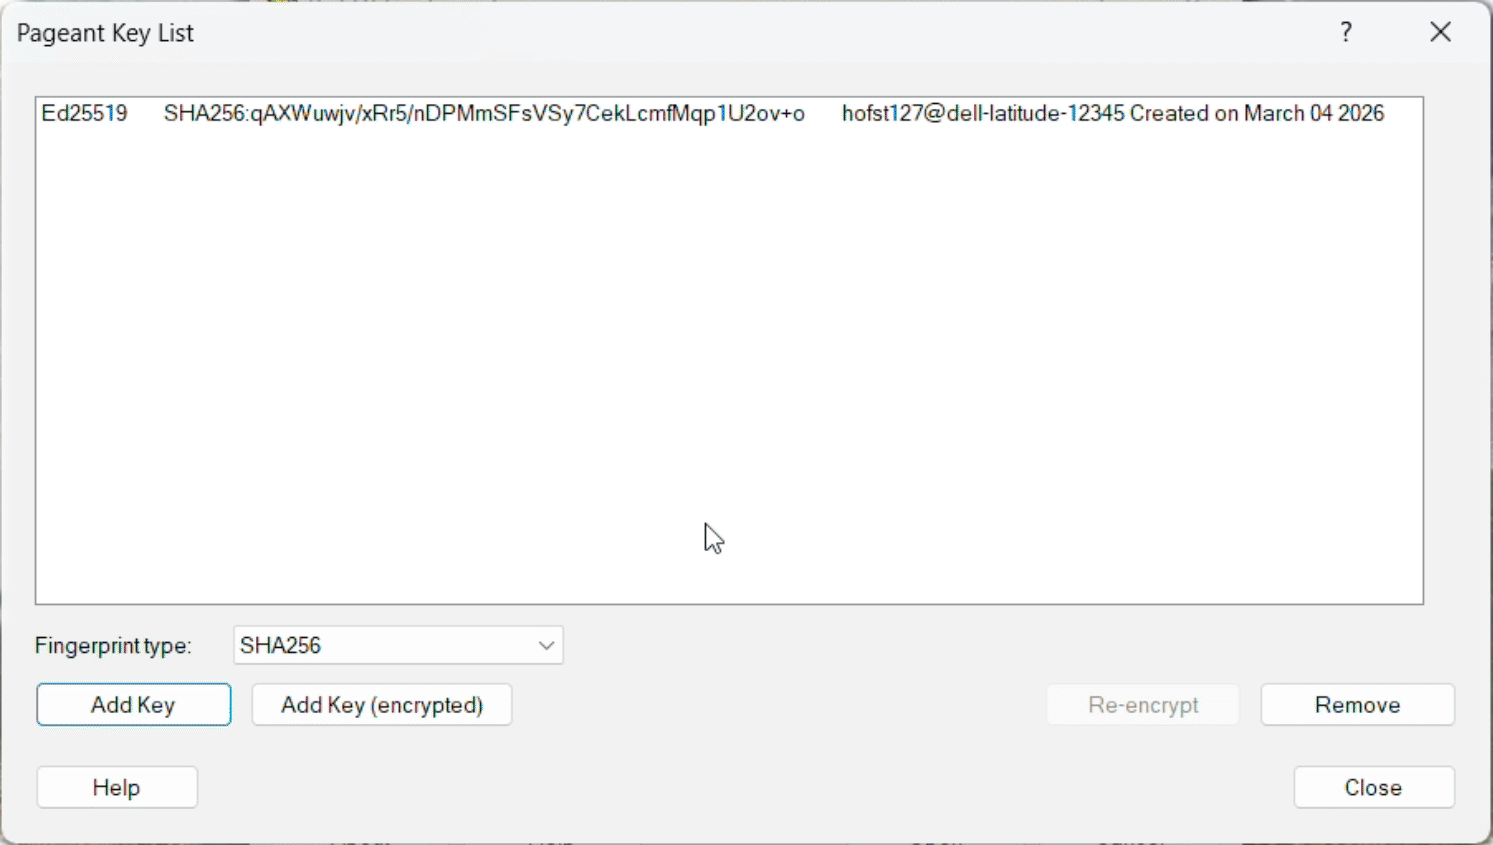
Once the key is loaded into Pageant, PuTTY can use it automatically for authentication.
Test the Connection with PuTTY
After the key has been added to MyMSI and your PuTTY session has been saved:
Open PuTTY.
In Saved Sessions, select your MSI session.
Select Open.
On first connection, PuTTY may prompt you to verify and cache the server’s host key. Review the host name carefully and accept it only if it matches the MSI system you intended to reach. Then:
Complete the Duo prompt.
You should now be connected to MSI using your SSH key.