cryosparc
Summary
Support Level: Secondary Support
Software Access Level: Open Access
Home Page: https://cryosparc.com
Software Description
No description provided.
Install Guide
CryoSPARC Installation and Configuration Guide for MSI Users
This guide provides instructions for installing, configuring, and running CryoSPARC as interactive and batch job on MSI clusters.
1. Installation
It is recommended that each user install their own copy of CryoSPARC in their home directory. This approach allows users to run CryoSPARC independently, manage their own CryoSPARC accounts, and keep project data isolated from other users.
The installation follows the workstation installation method described on the CryoSPARC website to simplify the setup of the CryoSPARC master and worker. At runtime, CryoSPARC can be reconfigured to operate in either workstation or cluster mode.
Installation Steps
Obtain a CryoSPARC license Request a CryoSPARC license from the official CryoSPARC website. The license number will be required during the installation process.
Request an interactive GPU node CryoSPARC worker installation requires access to a GPU. Start an interactive session on a GPU node and reserve sufficient time, as the installation may take a while. In this example, an A40 GPU node is requested. Log in to an MSI login node, then run the following command to request an interactive GPU session:
srun -N 1 --ntasks-per-node=1 -t 2:00:00 -p interactive-gpu --gres=gpu:a40:1 --pty bashCreate the installation directory Create a directory under your home directory for the CryoSPARC installation. In this guide, CryoSPARC is installed in ~/cryosparc.
mkdir  ~/cryosparc
cd  ~/cryosparc
Create an environment variable for your license ID Set an environment variable to store your CryoSPARC license ID:
LICENSE_ID="your-unique-license-id"
Download CryoSPARC master and worker packages Download the latest master and worker installation files using the license ID:
curl -L https://get.cryosparc.com/download/master-latest/$LICENSE_ID -o cryosparc_master.tar.gz
curl -L https://get.cryosparc.com/download/worker-latest/$LICENSE_ID -o cryosparc_worker.tar.gz
Extract the downloaded archives:
tar -xf cryosparc_master.tar.gz cryosparc_master
tar -xf cryosparc_worker.tar.gz cryosparc_worker
Verify available ports for CryoSPARC installation By default, CryoSPARC uses ports 61000–61009. These ports are not used by other MSI system services but may already be occupied by CryoSPARC instances running under other user accounts. You may choose an alternative port during installation to avoid conflicts with other users’ CryoSPARC processes at runtime. To check whether port 61000 is available, run:
nc -zv localhost 61000
If the command returns messages similar to the following:
nc: connect to localhost (127.0.0.1) port 61000 (tcp) failed: Connection refused
nc: connect to localhost (::1) port 61000 (tcp) failed: Cannot assign requested address
this indicates that the port is not currently in use and is available for the CryoSPARC installation.
Single-workstation installation (install both master and worker) For a single-node setup, install both the CryoSPARC master and worker on the same node. Change to the CryoSPARC master directory, then run the installation script with the required options:
cd cryosparc_master
./install.sh
	--standalone \
	--license $LICENSE_ID \
	--worker_path <worker path> \
	--ssdpath <ssd path> \
	--initial_email <user email> \
	--initial_username "<login username>" \
	--initial_firstname "<given name>" \
	--initial_lastname "<surname>" \
	[--port <port_number>] \
	[--initial_password <user password>]
Notes:
–standalone installs both the master and worker on the same machine.
–worker_path must point to the extracted cryosparc_worker directory.
–ssdpath should be a fast disk (e.g., local or global scratch). This path can be modified later at runtime (see the Running CryoSPARC section).
The default port range is 61000–61009. Use –port if you need to specify a different port.
The following example uses local scratch space for –ssdpath.
./install.sh
	--standalone \
	--license $LICENSE_ID \
	--worker_path ~/cryosparc/cryosparc_worker \
	--ssdpath /scratch.local \
	--initial_email "your_email@umn.edu" \
	--initial_password "your_password" \
	--initial_username "username" \
	--initial_firstname "FirstName" \
	--initial_lastname "LastName" \
	--port 61000
2. Running CryoSPARC at MSI
The CryoSPARC master process runs as a web server. Users access the CryoSPARC graphical user interface (GUI) through a web browser (e.g., Google Chrome), which is used to manage projects and submit computational jobs.
Preparing CryoSPARC for Each Run
CryoSPARC must be reconfigured each time it is launched. Before using CryoSPARC, create a shell script to update its configuration and start the CryoSPARC web server. This is required because MSI allocates a different compute node—and therefore a different IP address—for each session, while CryoSPARC stores a static hostname and IP address in its master and worker configuration files.
Below is an example shell script named start_cryosparc.sh that automates this process. The script:
Updates the hostname in the CryoSPARC master configuration
Reconnects the CryoSPARC worker to the master using the correct host IP address
Starts the CryoSPARC web server
Please modify CRYOSPARC_PATH and PORT to reflect your local installation. SSD_PATH may be changed according to your requirements.
#!/bin/bash

# Set your CryoSPARC configuration here
CRYOSPARC_PATH="your_home_directory/cryosparc"   # Where CryoSPARC is installed. Please use full path for home directory. Otherwise, the script will fail.
SSD_PATH="/tmp/your_name_cryosparc"   # Change the ssd path to desired location. For example, /scratch.local (the same as /tmp) or /scratch.global
PORT=61000   # Change the port to the installation port

# Check files
# check if config.sh exists
CONFIG_FILE="${CRYOSPARC_PATH}/cryosparc_master/config.sh"
if [ ! -f "$CONFIG_FILE" ]; then
	echo "Error: Config File '$CONFIG_FILE' not found."
	exit 1
fi

# check if cryosparcm exist
MASTER_EXE="${CRYOSPARC_PATH}/cryosparc_master/bin/cryosparcm"
if [ ! -f "$MASTER_EXE" ]; then
	echo "Error: '$MASTER_EXE' not found."
	exit 1
fi

# check if cryosparcw exist
WORKER_EXE="${CRYOSPARC_PATH}/cryosparc_worker/bin/cryosparcw"
if [ ! -f "$WORKER_EXE" ]; then
	echo "Error: '$WORKER_EXE' not found."
	exit 1
fi

# check ssd path
if [ ! -d "$SSD_PATH" ]; then
	mkdir -p "$SSD_PATH"
fi

# Update CryoSPARC config file
CURRENT_HOST=$(hostname -f)
# use sed to replace the hostname in the config file
if sed -i "s/^\(export CRYOSPARC_MASTER_HOSTNAME=\)\".*\"/\1\"$CURRENT_HOST\"/" "$CONFIG_FILE"; then
	echo "Updated CRYOSPARC_MASTER_HOSTNAME to '$CURRENT_HOST' in $CONFIG_FILE."
else
	echo "Error: failed to update CRYOSPARC_MASTER_HOSTNAME in $CONFIG_FILE."
	exit 1
fi

# Start cryosparcm
$MASTER_EXE start
if [ $? -eq 0 ]; then
	# update CryoSPARC default worker
	$MASTER_EXE cli "remove_scheduler_lane('default')"
	$WORKER_EXE connect --worker $CURRENT_HOST --master $CURRENT_HOST --port $PORT --ssdpath $SSD_PATH --lane default --newlane
	echo "CryoSPARC started at $(date) on $CURRENT_HOST"
else
	echo "Error: failed to start cryosparcm correctly"
	$MASTER_EXE stop
	exit 1
fi
There are two ways to run CryoSPARC at MSI:
Method 1: Run CryoSPARC and the web browser on the same GPU node via Open Ondemand (recommended for simplicity)
In this approach, both the CryoSPARC web server and the user’s web browser run on the same MSI GPU compute node.
Request a GPU node Use Open OnDemand to request a GPU compute node with a remote desktop session.
Start the CryoSPARC web server Open a terminal, navigate to the directory containing the
start_cryosparc.shscript, and run:./start_cryosparc.sh
This command updates the CryoSPARC configuration and starts the CryoSPARC web server.
Access the CryoSPARC web interface Open a web browser within the remote desktop session and navigate to the following address (replace the port number if a different port was specified during installation):
http://localhost:61000
When you finish using CryoSPARC, shut down the CryoSPARC web server Stop the CryoSPARC web server by running:
cryosparcm stop
If the cryosparcm command is not found (for example, if the binary path was not added to your environment during installation), change to the following directory and run the command from there:
cd <your_cryosparc_installation_directory>/cryosparc_master/bin
./cryosparcm stop
This step cleanly shuts down CryoSPARC to prevent database lockups.
Method 2: Run CryoSPARC and the web browser on different machines
This approach provides more flexibility but requires additional steps.
Run the CryoSPARC web server on an MSI GPU compute node
Run the web browser on:
another lightweight MSI node, or
the user’s local computer
If the web browser is running outside the MSI cluster, SSH tunneling (port forwarding) must be configured to access the CryoSPARC web server. This is necessary because compute nodes are not directly accessible from the public network. Detailed instructions for setting up SSH tunneling from a Windows system are provided in the following section.
1. Start the CryoSPARC Web Server
The CryoSPARC web server can be started either interactively in a remote shell or in batch mode using a Slurm job.
Option A: Start the Web Server in an Interactive HPC Session
Request a GPU node From a terminal, request a GPU node with sufficient wall time for your work (e.g., A40, A100, or L40S). Adjust the requested resources as appropriate. When using local scratch for
SSD_PATH, you can add the--tmpflag to request the desired amount of local scratch storage. This is not required when using global scratch. Example (MSI terminal, requesting an A40 node):
srun -N 1 --ntasks-per-node=8 --mem=64G -t 4:00:00 -p interactive-gpu --gres=gpu:a40:1 --pty bash
Start the CryoSPARC web server After a compute node has been allocated, change to the directory containing
start_cryosparc.sh, run the script:./start_cryosparc.sh
Note the host name of the allocated node where CryoSPARC is running. With this method, you can continue to control CryoSPARC using cryosparcm commands directly in the terminal.
Note: When you finish using CryoSPARC, shut down the CryoSPARC web server by running:
cryosparcm stop
Option B: Start the Web Server Using a Slurm Job
Create a Slurm job script Create a Slurm script that requests the desired resources and wall time, and runs
start_cryosparc.sh. Please modify the slurm script as needed for your job. Set the sleep time (which corresponds to the actual cryosparcm runtime) to be shorter than the requested wall time so that CryoSPARC can shut down cleanly. If CryoSPARC starts successfully, the host name will be recorded in thecryosparc_statusfile located in thestart_cryosparc.shdirectory. For example,
	#!/bin/bash -l

	#SBATCH --time=1:00:00
	#SBATCH -N 1
	#SBATCH --ntasks=8
	#SBATCH --mem=64g
	#SBATCH --tmp=800g
	#SBATCH --gres=gpu:a100:1
	#SBATCH -p msigpu
	#SBATCH --mail-type=BEGIN,END,FAIL
	#SBATCH --mail-user=your_account@umn.edu

	cd path_of_start_cryosparc
	echo "CryoSPARC is not running" > cryosparc_status
	if ./start_cryosparc.sh; then
		echo "CryoSPARC started at $(date) on $(hostname -f)" > cryosparc_status
		sleep 55m        # this is the actual cryosparc run time. It should be less than the requested wall time to allow cryosparc to start and shut down cleanly
		cryosparcm stop  # shut down cryosparc cleanly to prevent database lockup. If cryosparc bin path was not added to the environment, add the full path to this command
		echo "CryoSPARC shutdown" > cryosparc_status
	fi
Submit the job Submit the job using sbatch. Once the job starts, note the host name of the node on which the job is running.
2. Access the CryoSPARC Web Interface
Option A: Run the Web Browser on an MSI Node You may use Open OnDemand to request a lightweight MSI node for running a web browser.
No GPU is required.
Minimal resources are sufficient, since all computation is performed on the GPU node where the CryoSPARC master and worker are running.
After the browser node starts: Note the host name where the CryoSPARC web server is running (e.g., agc01). In the web browser, enter the following URL: http://agc01.agate.msi.umn.edu:61000
Option B: Run the Web Browser on Your Personal Computer Running the web browser on your local computer provides better visualization and avoids the latency of remote desktop streaming.
Because MSI compute nodes are not accessible from the public network, you must use SSH tunneling to access the CryoSPARC web server. If you are connecting from outside the UMN network, first connect to the UMN VPN.
Below are examples of how to make the connection on Windows and macOS systems. In these examples, we assume that CryoSPARC is running on agc01.agate.msi.umn.edu using port 61000.
Using Windows 11 and PuTTY Note: On Windows, when using SSH tunneling, internet access will be unavailable except for traffic routed through the VPN.
After CryoSPARC web server starts running, note the host name where the server is running.
Set Up SSH Port Forwarding with PuTTY
Open a new PuTTY session for ssh tunneling.
In Session, enter the MSI login node as the host name.
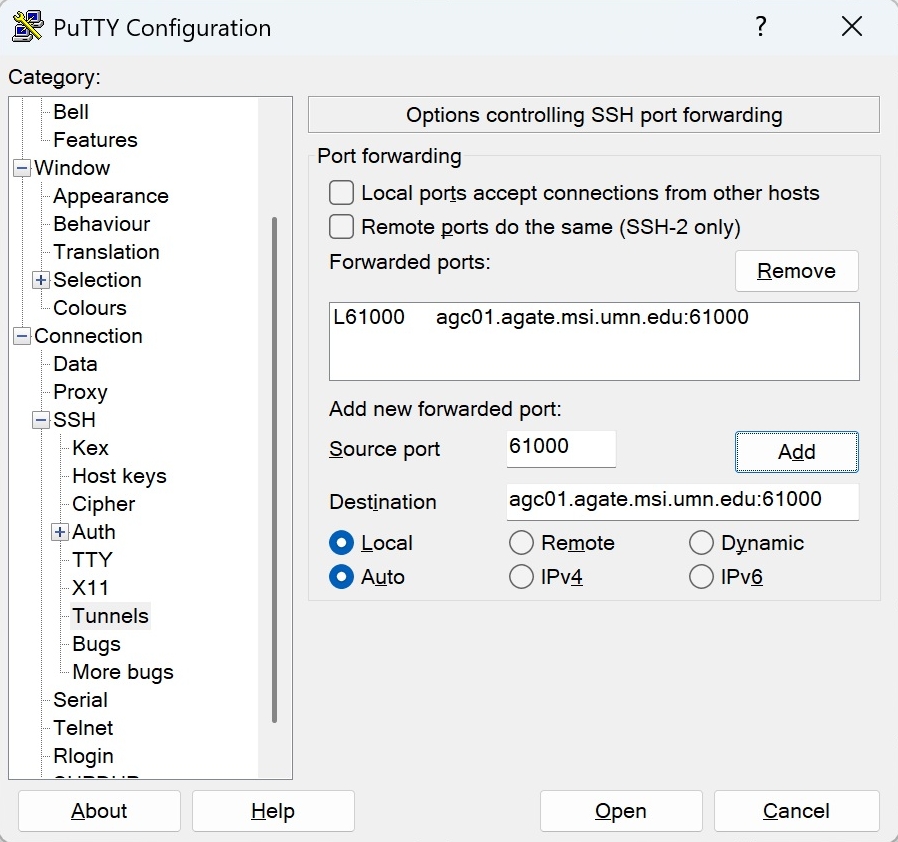
Navigate to Connection → SSH → Tunnels, set the following fields
Source port: 61000
Destination: agc01.agate.msi.umn.edu:61000
Select Local port forwarding
Click Add
Click Open to connect to the MSI login node.
Configure Proxy Settings in Windows 11
Go to Windows 11 Settings → Network & Internet → Proxy. Shortcut: If you are using the Chrome web browser, you can open the system settings via Chrome menu → Settings → System → Open your computer’s proxy settings.
Under Manual proxy setup, click Set up. Enter:
Proxy IP address: 127.0.0.1
Port: 61000
Turn on the proxy server. Ensure “Don’t use the proxy server for local (intranet) addresses” is unchecked.
Access CryoSPARC in a Web Browser Open a web browser. Enter the following URL: http://127.0.0.1:61000
You should now be connected to the CryoSPARC web interface running on agc01.agate.msi.umn.edu.
Note: for Windows system, Internet access will be unavailable while the proxy is enabled. This does not affect active SSH connections made through VPN.
After finishing your work, restore Internet Access Go to Windows Settings → Network & Internet → Proxy. Turn off the proxy server to restore normal internet access.
Using macOS and the Terminal App
Set Up SSH Port Forwarding Open the macOS Terminal app and run:
ssh -L 61000:agc01.agate.msi.umn.edu:61000 your_user_name@agate.msi.umn.edu
Make sure the hostname following the -L flag (for example, agc01.agate.msi.umn.edu) is the GPU node running the CryoSPARC web server, not the login node (agate.msi.umn.edu) used for SSH tunneling.
Keep the Terminal app open while connecting to the CryoSPARC web server.
Configure Proxy Settings in macOS
Open macOS System Settings and select your active network (for example, Wi-Fi).
Click Details, then open the Proxies tab.
Enable Web Proxy (HTTP). In the Server field, enter 127.0.0.1. In the Port field, enter 61000. Shortcut: If you use the Chrome web browser, you can open the system settings via Chrome menu → Settings → System → Open your computer’s proxy settings.
Access CryoSPARC in a Web Browser Open a web browser. Enter one of the following URLs: http://127.0.0.1:61000 http://localhost:61000
After finishing your work, turn Off the Proxy Turn off the proxy settings configured in Step 2.
3. Configure CryoSPARC to Run in Cluster Mode
CryoSPARC can be configured to run in cluster mode, where worker processes are launched via SLURM on an HPC system. In cluster mode:
The CryoSPARC web server can be run on a lightweight compute node.
Data processing jobs are dispatched to GPU nodes through SLURM.
You can scale to many GPU nodes, rather than being limited to a single GPU node.
Steps
Create cluster configuration templates Create the following two template files:
cluster_info.json{ "name": "slurm-lane", "worker_bin_path": "cryosparc_installation_directory/cryosparc_worker/bin/cryosparcw", "send_cmd_tpl": "{{ command }}", "qsub_cmd_tpl": "sbatch {{ script_path_abs }}", "qstat_cmd_tpl": "squeue -j {{ cluster_job_id }}", "qdel_cmd_tpl": "scancel {{ cluster_job_id }}", "qinfo_cmd_tpl": "sinfo" }
cluster_script.sh#!/bin/bash -l #SBATCH --time=8:00:00 #SBATCH --ntasks=1 #SBATCH -p msigpu #SBATCH --job-name cryosparc_{{ project_uid }}_{{ job_uid }} #SBATCH --cpus-per-task={{ num_cpu }} #SBATCH --gres=gpu:a100:{{ num_gpu }} #SBATCH --mem={{ ram_gb|int }}G #SBATCH --tmp=800g #SBATCH --comment="created by {{ cryosparc_username }}" #SBATCH --output={{ job_dir_abs }}/{{ project_uid }}_{{ job_uid }}_slurm.out #SBATCH --error={{ job_dir_abs }}/{{ project_uid }}_{{ job_uid }}_slurm.err #SBATCH --mail-type=BEGIN,END,FAIL #SBATCH --mail-user=your_account@umn.edu {{ run_cmd }}
These files define the cluster resources and the SLURM job submission script used by CryoSPARC. Update the lane name in
cluster_info.jsonand the computing resource settings incluster_script.shas needed for your project.Connect the cluster worker lane Ensure the CryoSPARC web server is running. From the directory containing the two template files, run:
cryosparcm cluster connect
This command registers the cluster worker lane with CryoSPARC. This step only needs to be performed once per cluster configuration.
Run jobs on the cluster When launching a data processing job in the CryoSPARC web interface, select the newly added cluster lane as the execution target. The job will then be submitted to the cluster via SLURM instead of running locally.
Notes: If all data processing jobs are run in cluster mode, the CryoSPARC server does not need to run on a GPU node. A lightweight compute node is sufficient for the server, since all compute-intensive tasks are executed on remote cluster nodes.
If CryoSPARC is started on a non-GPU node, you should remove or comment out the lines that modify the default scheduler lane associated with GPU workers.
In start_cryosparc.sh, comment out or delete the following section:
# update CryoSPARC default worker
$MASTER_EXE cli "remove_scheduler_lane('default')"
$WORKER_EXE connect --worker $CURRENT_HOST --master $CURRENT_HOST --port $PORT --ssdpath $SSD_PATH --lane default --newlane
Further Information For detailed instructions on configuring, connecting, and removing cluster workers, refer to the official CryoSPARC documentation.
4. Troubleshooting Your CryoSPARC Installation
Note: If multiple users start the CryoSPARC web server on the same node using the same port, a conflict will occur.
For official guidance, please refer to the CryoSPARC documentation: Guide: Installation Testing with cryosparcm test.
You can also verify that CryoSPARC is running correctly by launching a test job through the web interface. In the CryoSPARC web UI, create a test project and workspace, then build and launch an instance test job. If the workers are functioning properly, the test job should complete within a few seconds.